User guide
A complete, step-by-step guide to setting up your business, taking bookings and giving your team their own logins.
Want to follow along? Open the live demo shop — its Staff login has a View the demo dashboard button for a read-only look at everything this guide covers.
1. Signing up
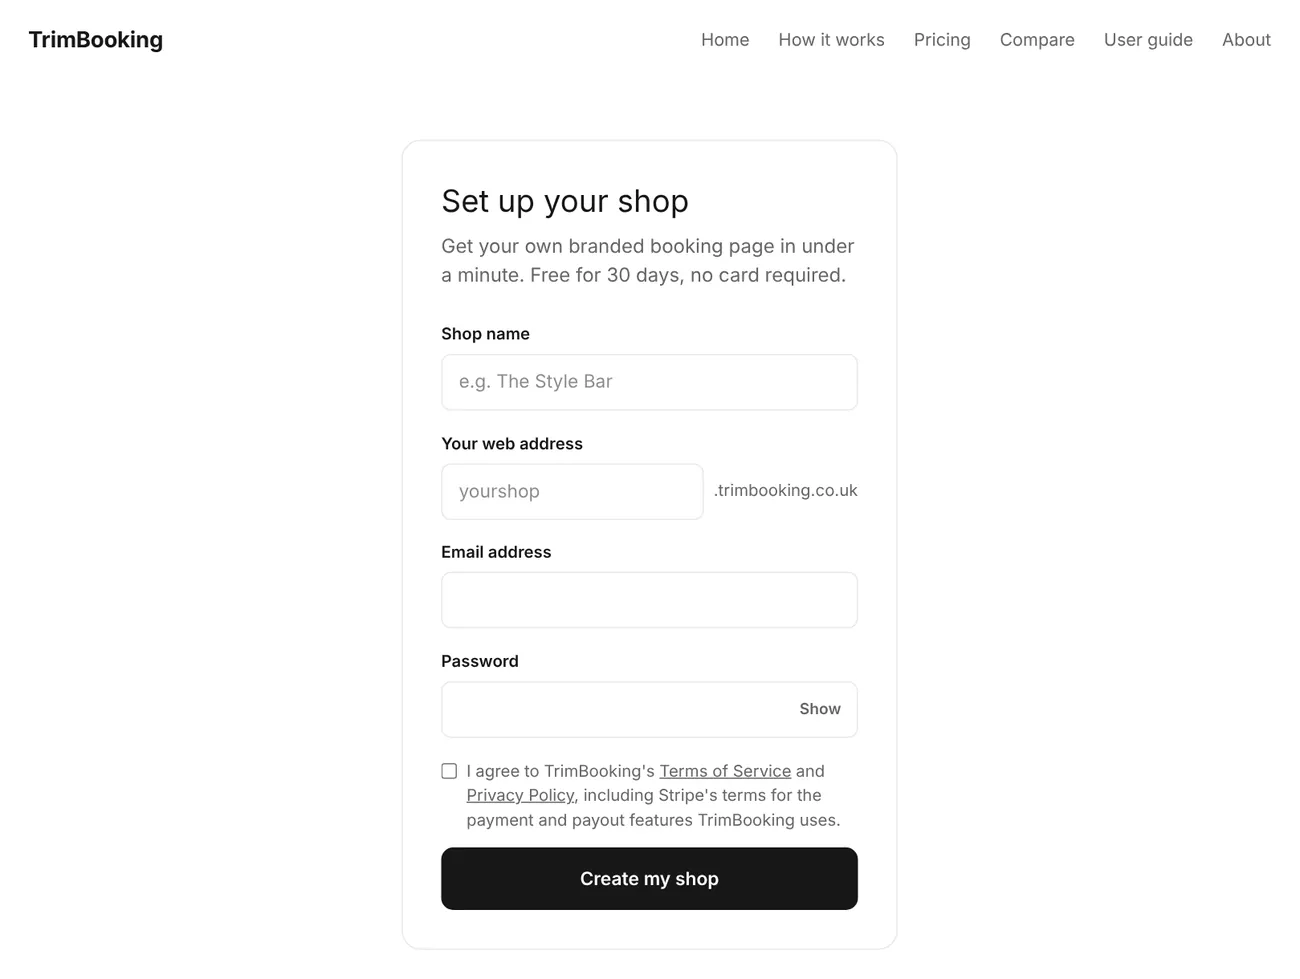
Go to the sign-up page and enter your business name and an email and password for your owner account. Choose a web address for your booking page — this becomes yourchoice.trimbooking.co.uk. You can use letters, numbers and hyphens.
After you submit the form, TrimBooking creates your business and sets up your booking page automatically. This can take a minute or two while your web address is registered — you'll see a progress screen, and a link to log in will appear as soon as it's ready.
2. Setting up your business
Log in at yourshop.trimbooking.co.uk/login to reach your dashboard. Every part of your shop has its own tile:
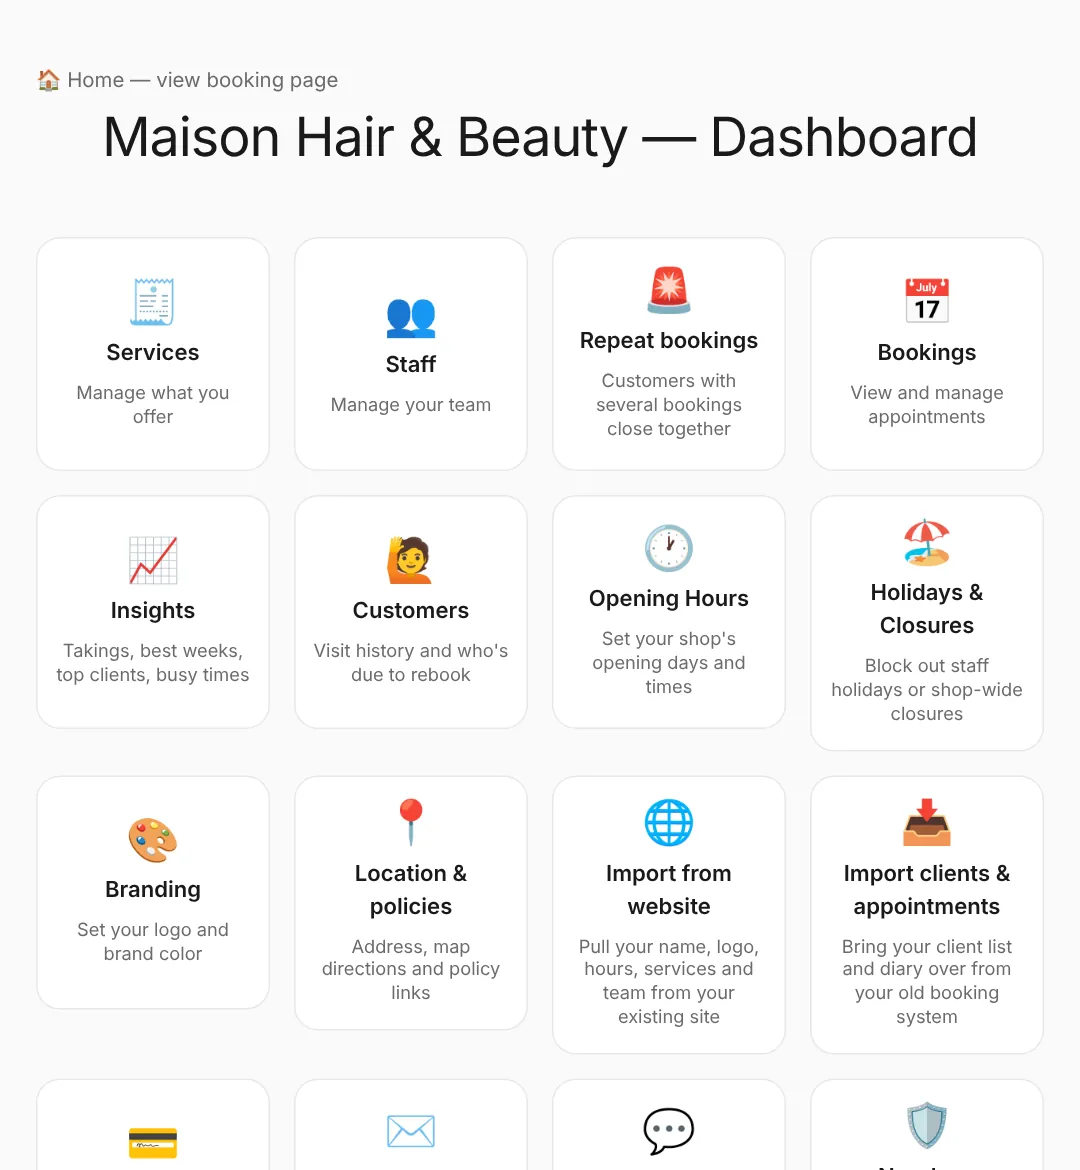
Start with these three:
- Branding — upload a logo and choose a brand colour. This appears on your booking page, staff profiles and emails.
- Location & policies — add your address and it appears on your booking page with Directions, Apple Maps and Waze links. Add policy links (e.g. Salon Policies, Privacy Policy) and they show beneath it. You can type them in, or fetch them from your existing website and review them before saving.
- Opening hours — set the days and hours your business is open. Customers can never book outside these hours, even if a staff member is individually available.
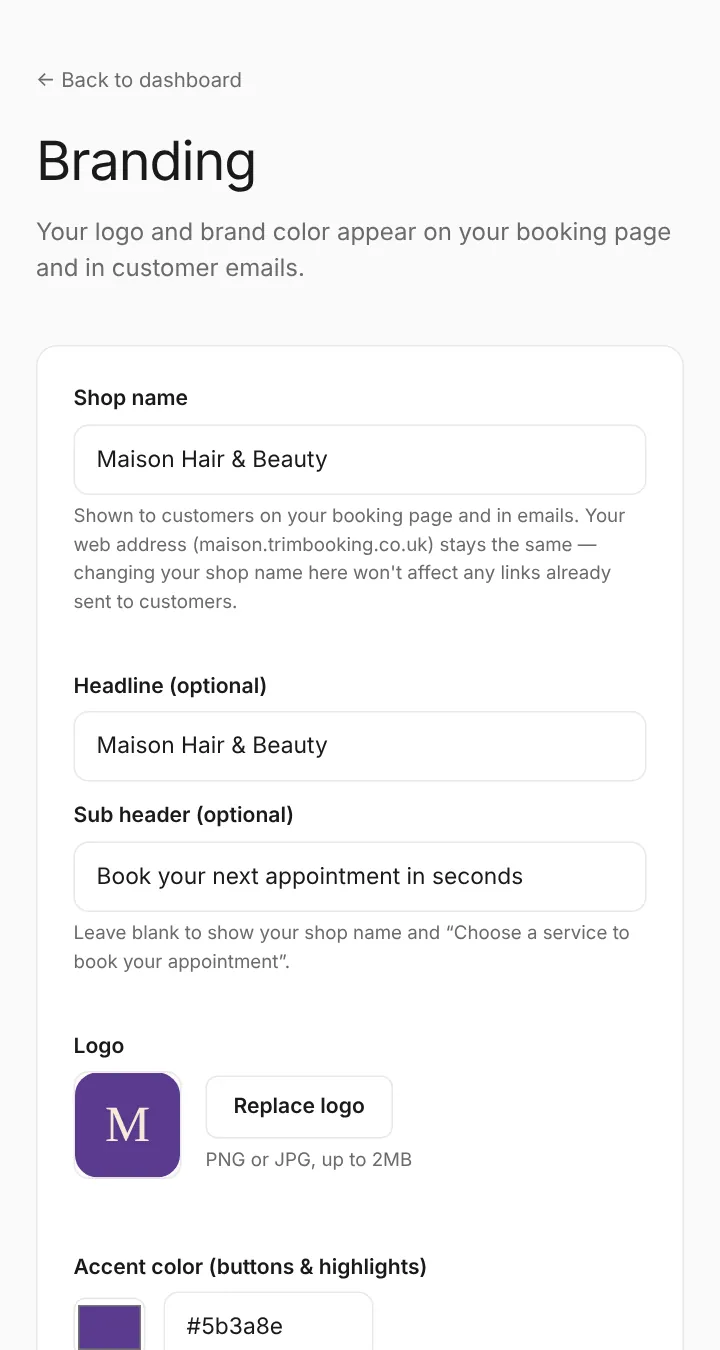
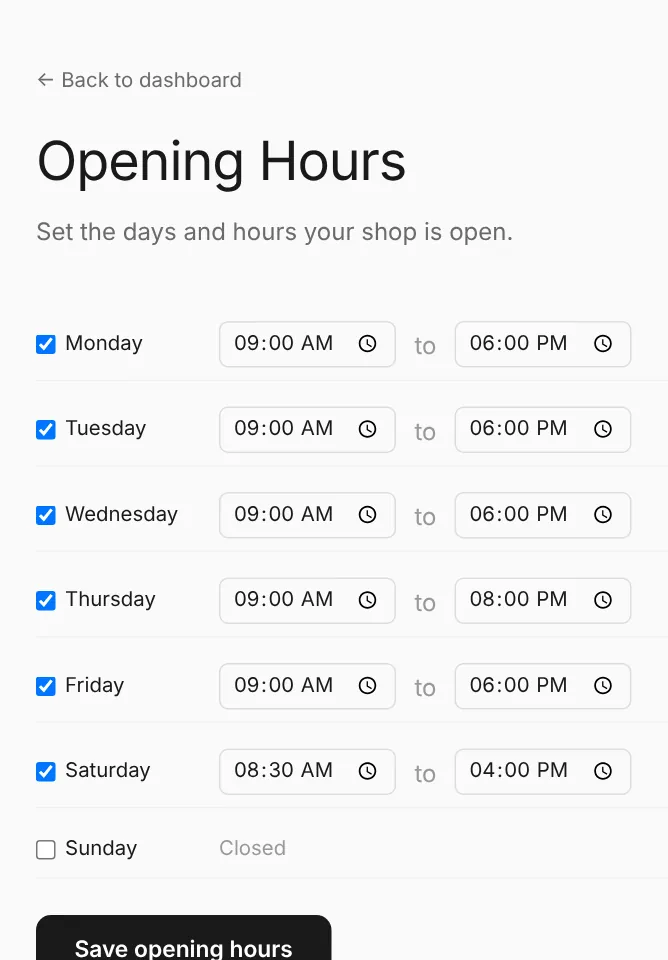
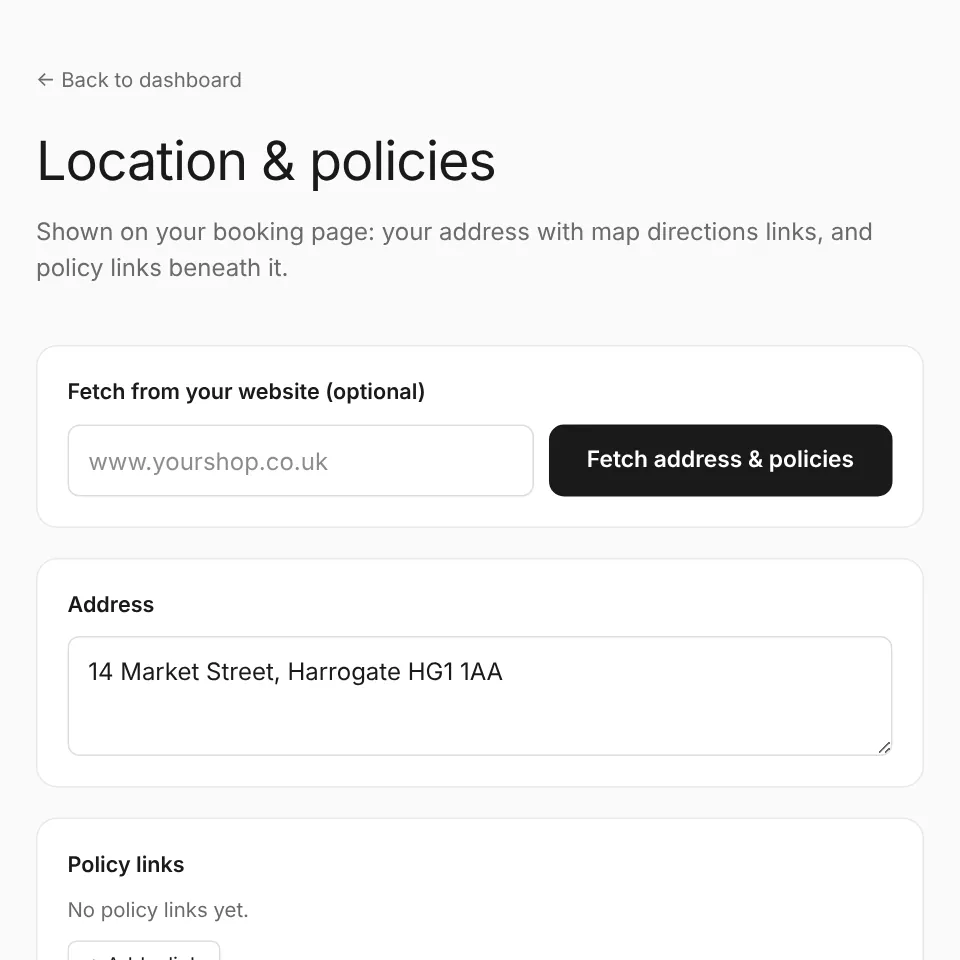
Changes save immediately and appear on your public booking page straight away.
3. Importing from your existing website
Already have a website? From Dashboard → Import from website, enter its address and we'll scan the public page for things you'd otherwise have to re-type: your shop name, logo, brand colour, headline and sub header (the big title and line under it on your homepage), font and colour scheme (text, background and button colours, matched to the nearest of our fonts), address, opening hours, services (with prices, where listed), team members and policy links. Want to see it first? Try the website import demo.
This is a best-effort reading of your page, not a guarantee — results depend entirely on how your current site is built and what it says. Nothing is saved automatically: you'll see a draft of everything it found, with a tick-box next to each item, so you can review, correct or discard anything before saving. When both services and team are imported, a grid lets you tick which team member performs which service — customers can only book a service with someone assigned to it. Each section (profile, headline, font & colours, address, hours, services, team, policies) has an Ignore this section switch, so anything you've already set up isn't touched or duplicated. A service or team member with the same name as one you already have is updated in place (price and duration, or role) rather than duplicated; new ones are added. If the same service or person already appears more than once, the duplicates are merged into one during the import — their bookings, holidays and service links are moved across first, so no history is lost. Imported opening hours, address, headline, font and colours replace your current ones, and policy links with the same name or address are updated — so double-check before saving.
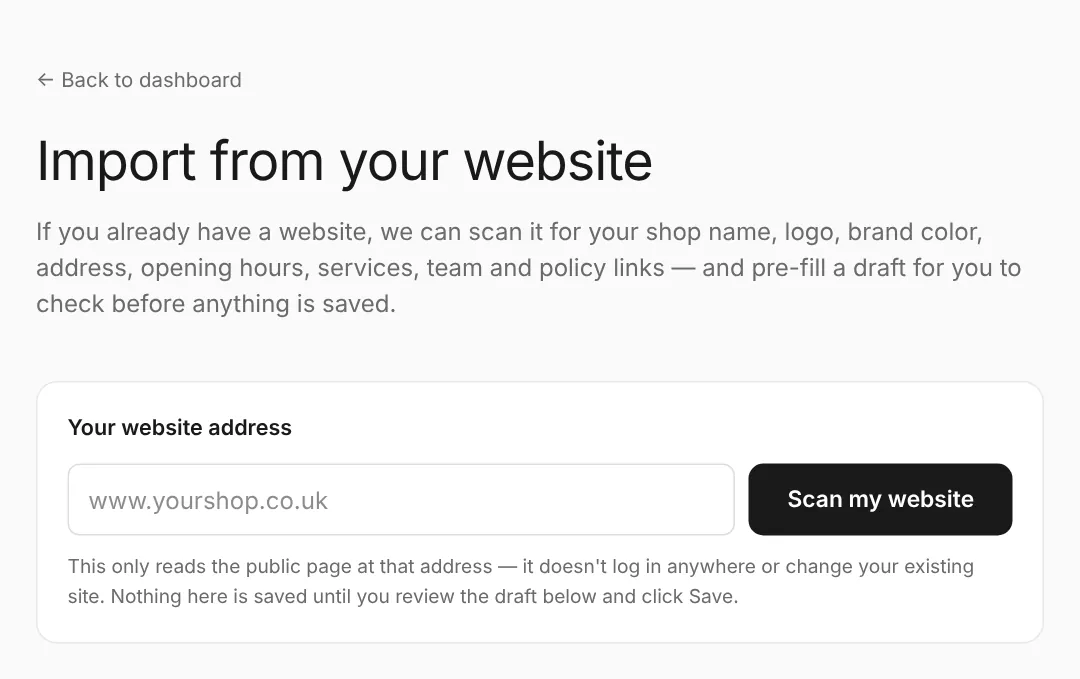
If a scan comes back thin or inaccurate, that's expected for some sites — just add the missing details yourself from Branding, Opening Hours, Services or Staff.
Bringing over your clients and appointments
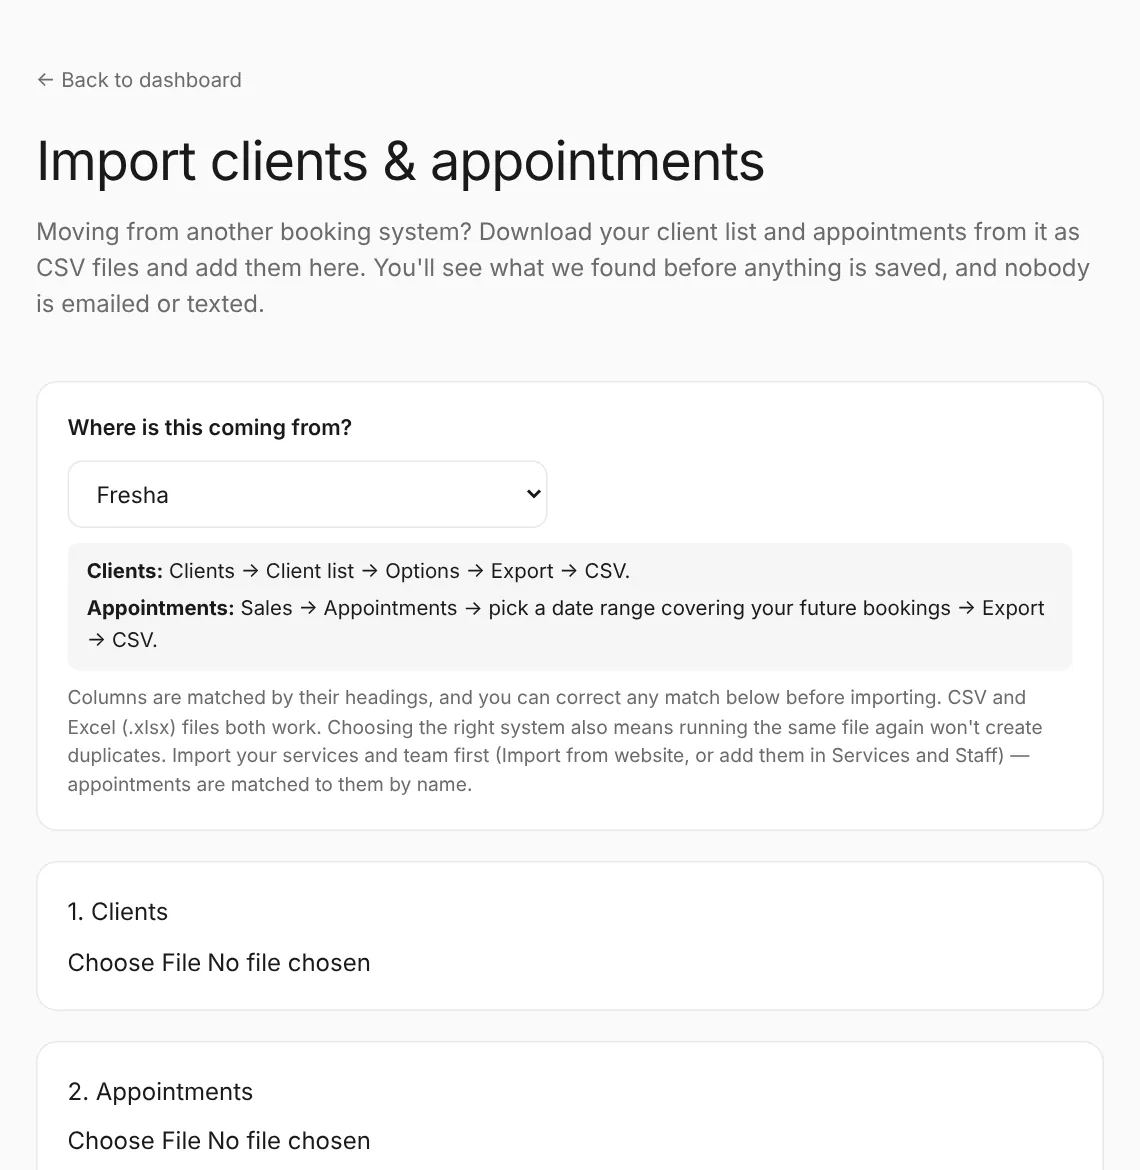
Moving from another booking system? Download your client list and your appointments from it as CSV files, then go to Dashboard → Import clients & appointments and add them. TrimBooking works out which column is which (name, email, phone, notes, date, time, service, staff member, status) and shows you a preview; you can change any column it got wrong before pressing Import. Set up your services and team first, because appointments are matched to them by name. Anything that can't be matched is listed so you can add it and import the same file again; nothing is duplicated. Clients already in TrimBooking with the same email or phone are filled in rather than duplicated.
Nobody is contacted by the import: no confirmations, no thank-yous and no "time to rebook" emails. Reminders for upcoming appointments are off too, unless you tick the box to switch them on (leave it off while your old system is still sending its own). Cancelled and no-show appointments are kept for the record but don't count as visits.
4. Adding services
In Services, add everything you offer — haircuts, colours, treatments and so on — along with a price and duration for each. Duration is used to work out how long a booking blocks out on a staff member's calendar.
Once a service exists, you can assign it to one or more staff members (see the next section) so customers only see the right staff for the service they've chosen. If only one staff member does a service, customers aren't asked to choose — the booking page just says who it's with.
A service you haven't assigned to anyone skips choosing a staff member altogether: customers see every time any of your team is free, and the booking goes to whoever is free then (the least busy that day, if several are). Handy for a consultation or a patch test that anyone can do.
Grouping services into categories
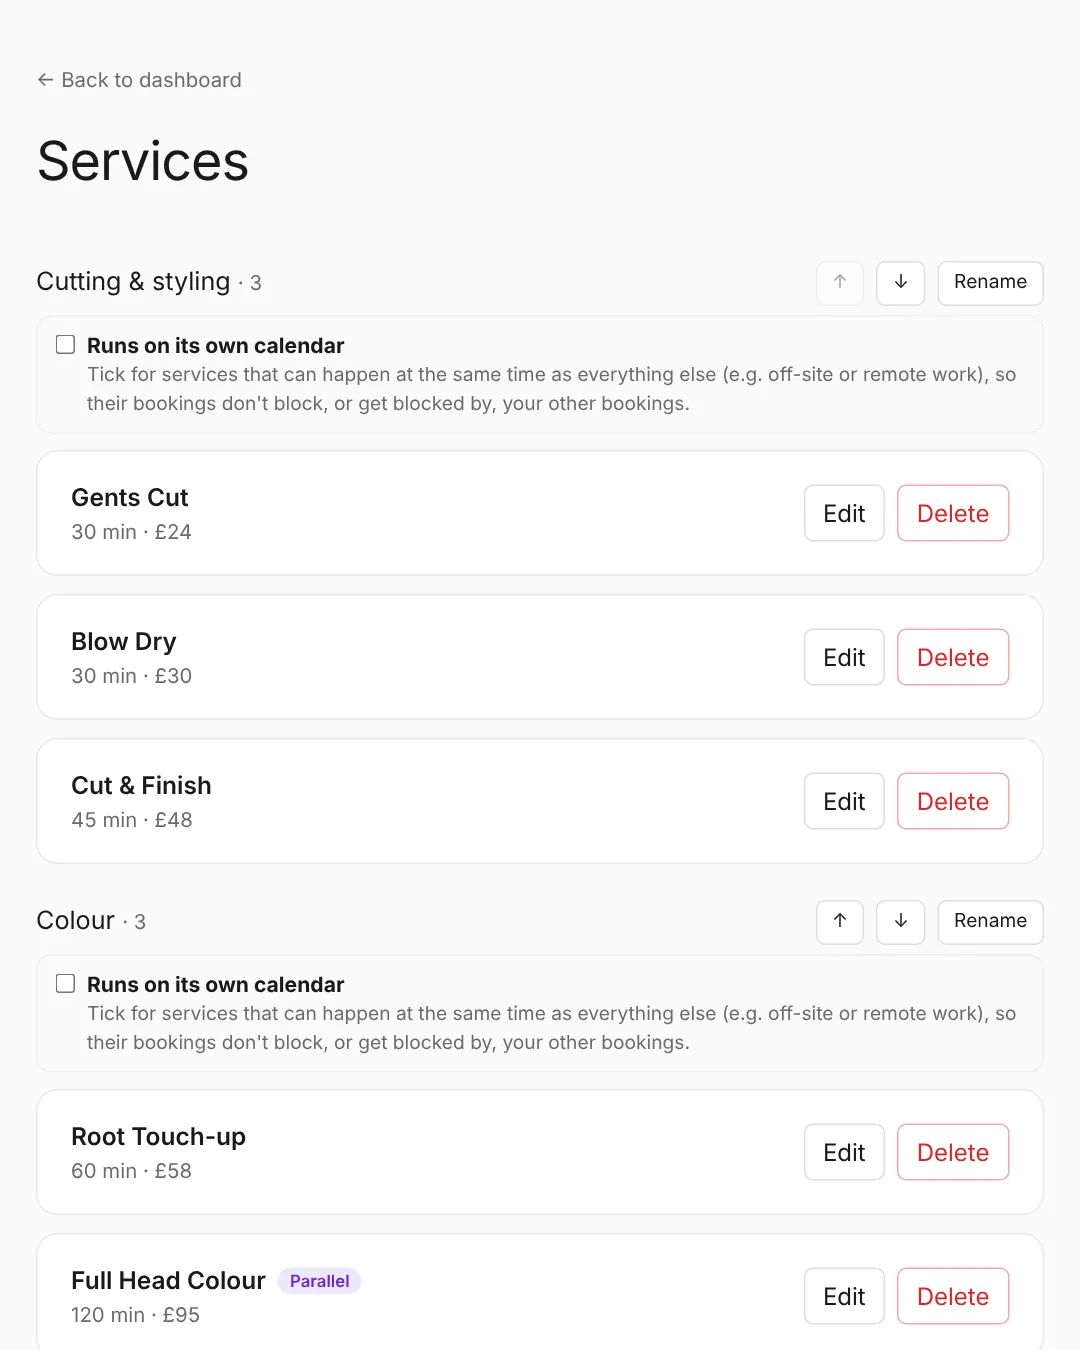
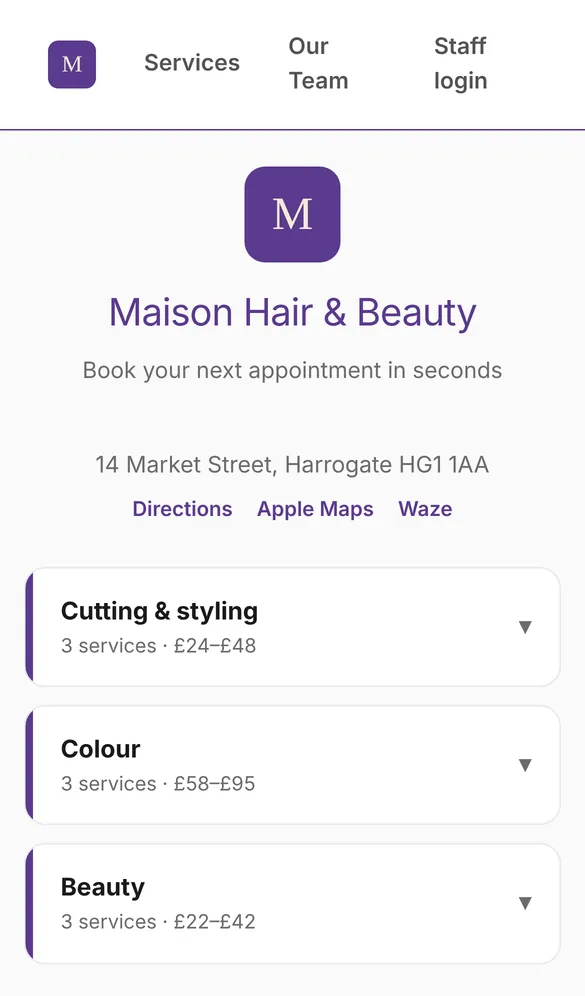
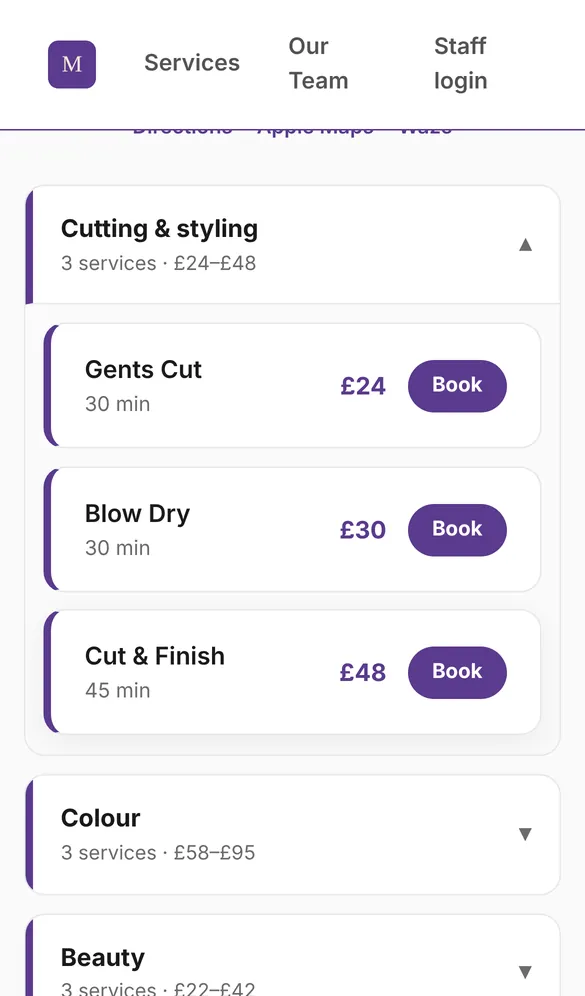
If you offer a lot of services, give each one a Category — for example Naturally curly hair, Colouring, Blow dries & hair up, Makeup. Pick one of your existing categories from the drop-down, or choose + Create a new category… and type a new name, so spellings stay consistent. On your booking page each category becomes a heading showing how many services it has and their price range; customers tap a heading to open it and choose a service, instead of scrolling one long list. Services without a category appear last, under Other services. Shops that don't use categories keep the plain list.
On the Services page, services are shown grouped the same way. Use the ↑ and ↓ buttons next to a category to set the order of the headings on your booking page, and Rename to rename a category for every service in it at once. Importing from your website brings categories across automatically when your booking platform has them (Revyfy and Fresha both do).
Categories with their own calendar (on-site, off-site, remote…)
Some work can happen at the same time as everything else — an off-site team out on visits while the shop is open, or remote appointments. Under each category on the Services page, tick Runs on its own calendar. That category's bookings then only compete with each other: they don't block your other bookings, and your other bookings don't block them.
How many can be booked at once is the number of staff linked to that category's services (Staff page). Link two off-site groomers and up to two off-site bookings can overlap; a third customer sees that time as full. Each booking goes to whichever linked person is free (or, if the service lets customers choose, the person they pick), and their working hours, breaks and holidays still apply, along with your opening hours.
Tip: you only need to tick it for the category that runs alongside the rest (e.g. Off-site). Leave your in-shop categories as they are and they keep working as normal, while the off-site bookings run in parallel. Staff linked to one own-calendar category aren't offered for services that have no staff linked.
Choosing a staff member, price, quiet appointments and attachments
Each service has these switches under When customers book this service (tap Edit on the service):
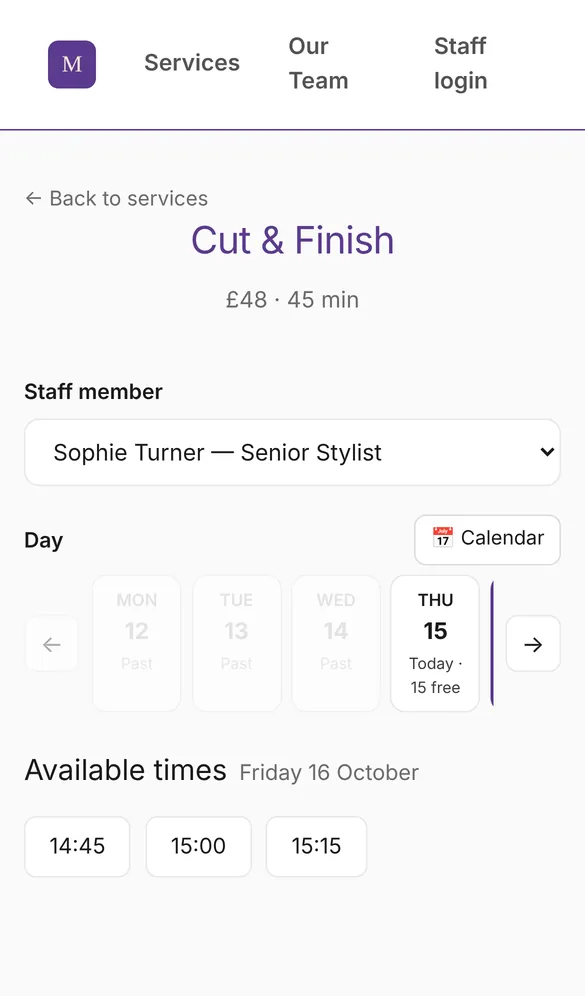
- Let customers choose a staff member — the booking page shows a staff drop-down, with Anyone available at the top (every time any of them is free; the booking goes to whoever is). Untick it to skip the drop-down and always book with whoever is free. If only one person does the service, the page just says who it's with.
- Show the price on your booking page — untick for services you price on consultation (colour corrections, extensions, a matted coat). Customers still see the service and how long it takes, just not the price. The price stays on your own dashboard and reports.
- Offer a “quiet appointment” option — shows the Quiet appointment tick-box on the booking form, for customers who'd prefer little or no chat. Untick it for services where it doesn't make sense, such as a dog groom.
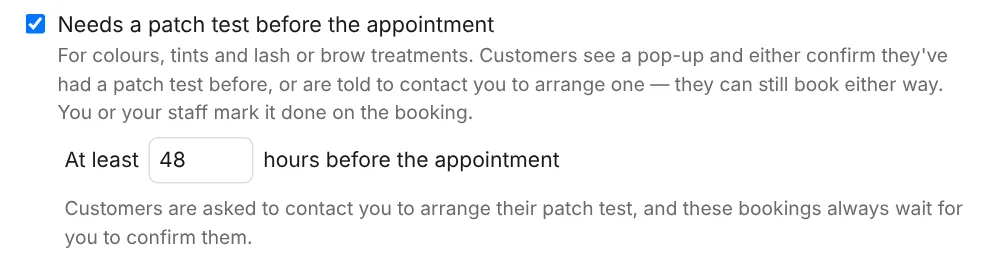
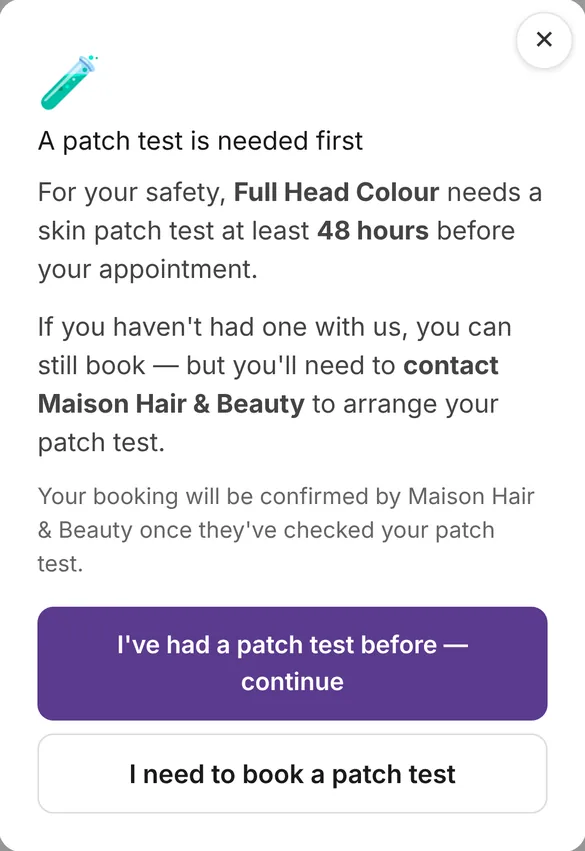
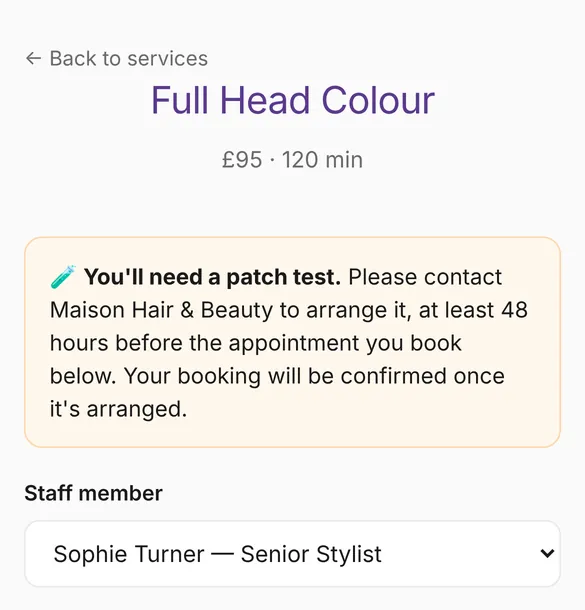
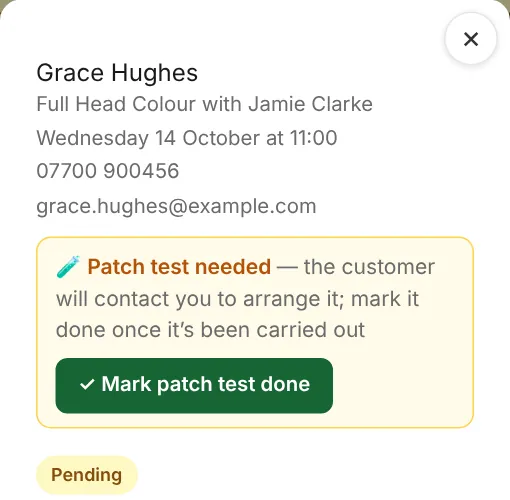
- Needs a patch test before the appointment — off to begin with; switch it on for colours, tints and lash or brow treatments. When a customer opens the service, a pop-up tells them a patch test is needed at least 48 hours before (you can change the number of hours), and they choose before any times appear: I've had a patch test before — continue, or I need to book a patch test. Either way they can book, ticking to confirm — those who need one are told to contact you to arrange it. These bookings always arrive as a request for you to confirm (even for staff who normally auto-confirm) and show 🧪 Patch test confirmed or 🧪 Patch test needed, so you know whether to arrange one before confirming. Once the patch test has been carried out (or you've checked your records), open the booking and tap ✓ Mark patch test done — the owner or any staff member can do this, and the booking then shows 🧪 Patch test done ✓ with the date it was marked.
- Let customers attach a photo or document — lets the customer add one photo or document when they book: a picture of the look they want, a patch-test or consultation form, a photo of their dog's coat. Photos (JPG, PNG, HEIC), PDFs and Word documents up to 10 MB.
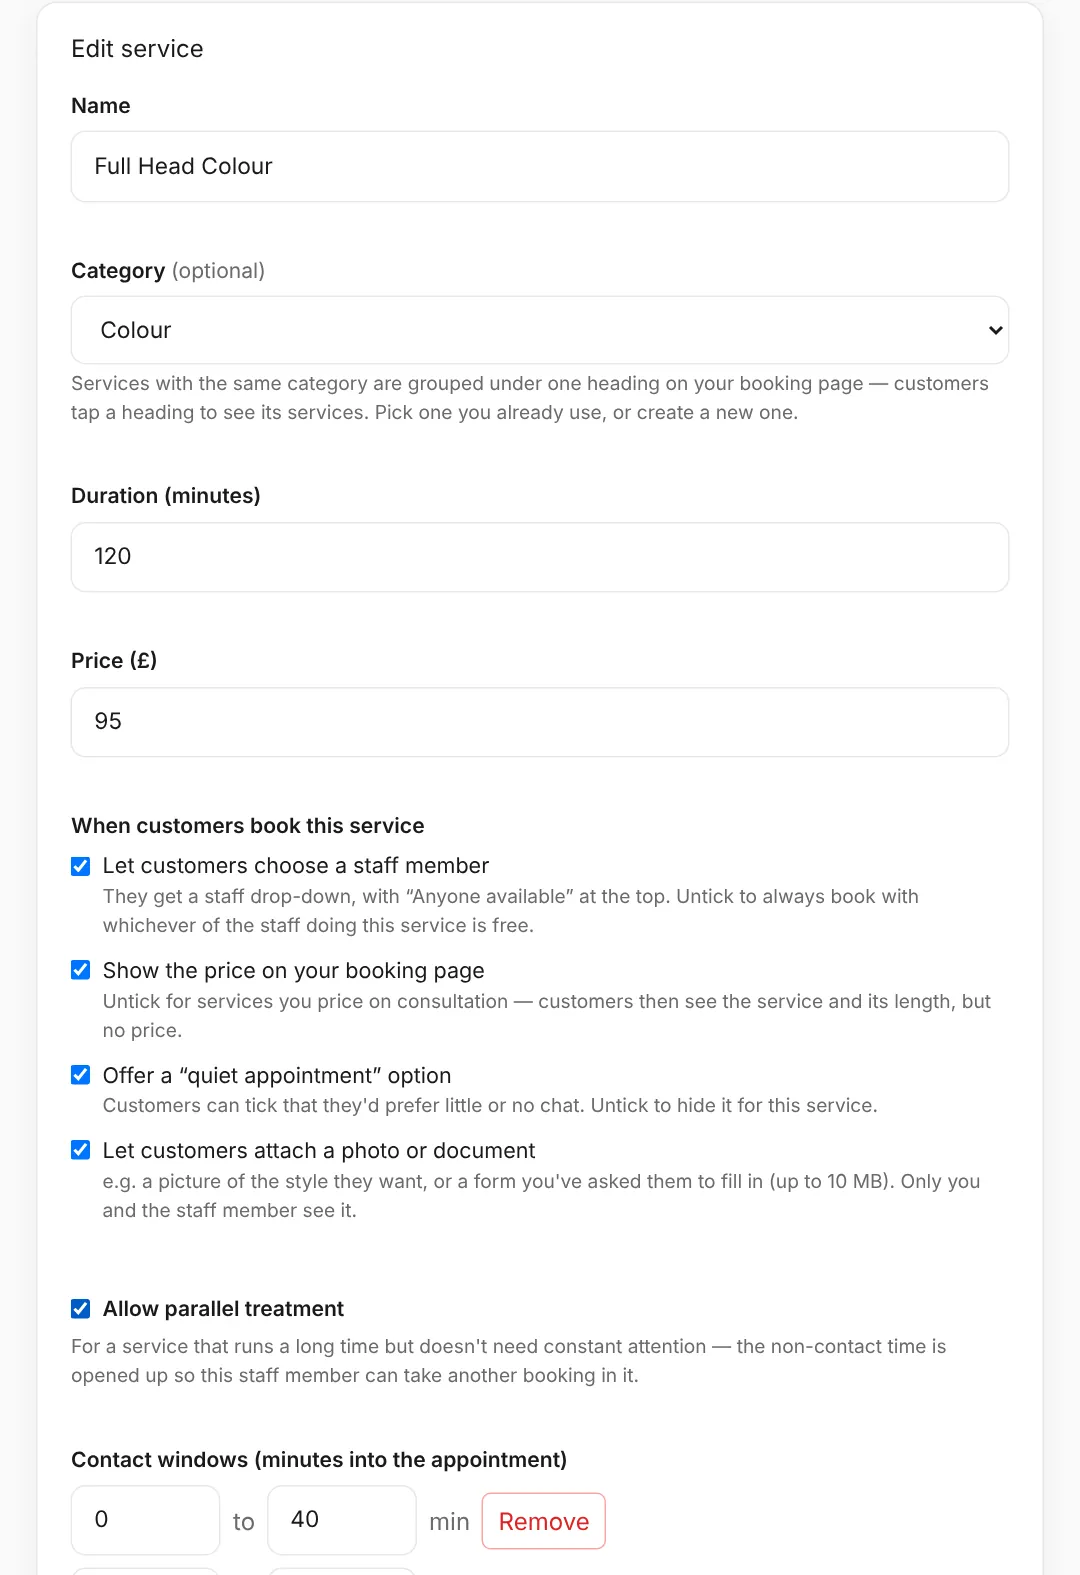
All of these except the patch test are on for every service to begin with. A service with one switched off shows Staff auto-assigned, Price hidden, No quiet option or No attachments on the Services page.
Patch tests
With Needs a patch test before the appointment switched on, this is what customers and your team see:
Parallel treatment
Some services run a long time but don't need a staff member's constant attention — a colour that needs processing time, a perm. Turn on Allow parallel treatment on a service and add one or more contact windows: the minutes within the appointment that actually need the staff member, given as a start and end minute from the start of the booking.
For example, a 180-minute colour service might need 45 minutes at the start and 20 minutes at the end — two windows, 0–45 and 160–180. The 115 minutes in between are left open, so that staff member can take another booking in the gap. Leave parallel treatment off (the default) and the whole duration needs them, exactly as before.
5. Adding staff
In Staff, click + Add staff member and fill in:
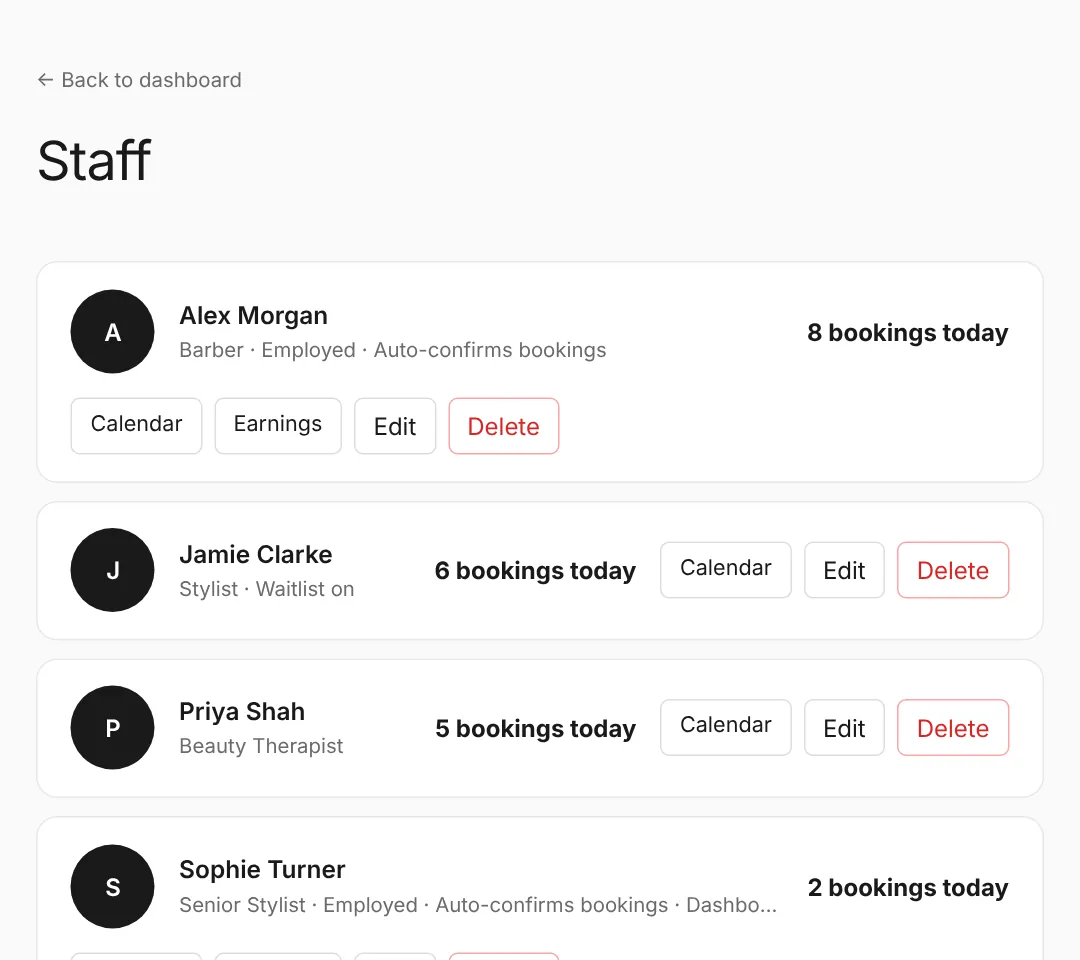
- Name, role and bio — shown on your public team page.
- Photo — optional. Tap Upload a photo to choose one from your phone or computer (big photos are shrunk automatically), or paste a link to one. Shown on your team page and their profile.
- Services offered — tick which services this person can be booked for. They're grouped under your service categories (so the same service listed in two categories, e.g. On-site and Off-site, shows once under each), with Tick all per category.
- Working hours — the days and hours this person is available. Customers can only book within both this and your business's opening hours.
- Breaks — block out lunch or any other time that shouldn't be bookable, per day.
- Automatically confirm this person's bookings — optional. Switch this on for a staff member and their bookings are accepted instantly when a customer requests them, instead of landing as a pending request for you to approve.
- Portal email, access level and dashboard admin — their login and what they can do with it. See section 6 and section 7.
- Employment status — Self-employed (the default, for someone renting their own chair) or Employed. This decides whether you see their schedule, earnings and Insights revenue from your own dashboard, or whether those stay private to their own portal — see the next section.
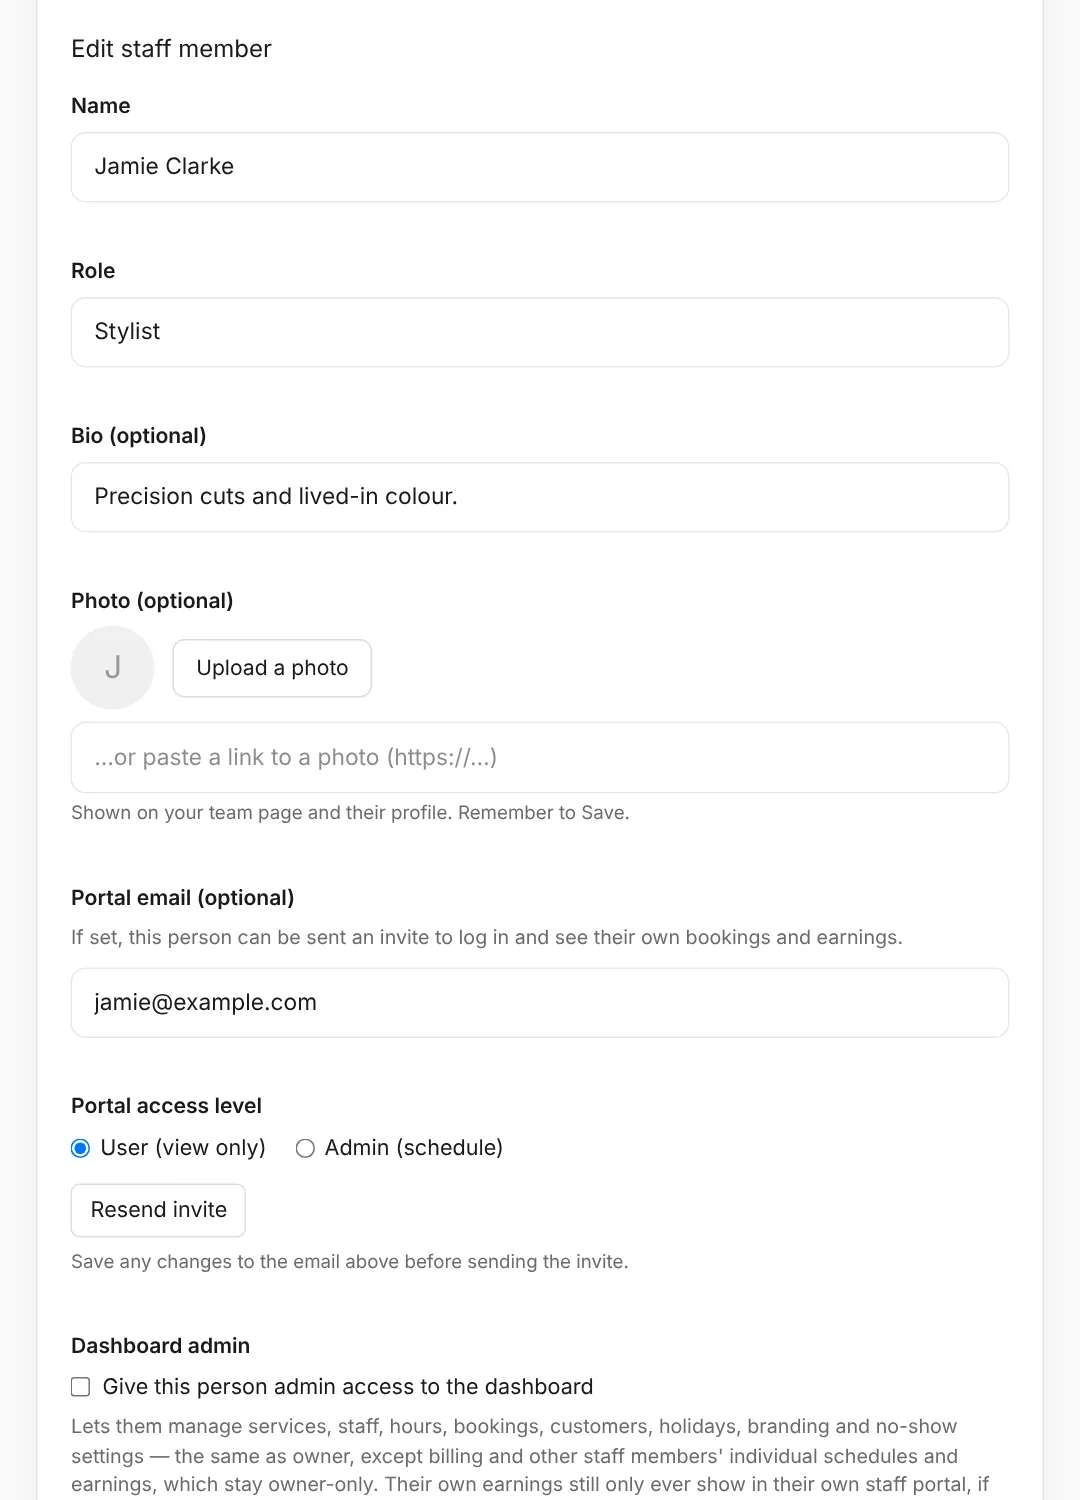
Click Save, and the staff member immediately appears on your public booking page. You can come back and edit any of these details, or delete a staff member, at any time.
Calendar on a staff member's card opens the Bookings calendar already filtered to them — their week or day at a glance, with everything you can do on the Bookings page (see Managing bookings). For an employed staff member you also have an Earnings button, showing their takings and recorded payments; a self-employed person's earnings stay private to them.
6. Staff logins & the staff portal
You can optionally give a staff member their own login, so they can see their own bookings and earnings without needing access to your owner dashboard.
Inviting a staff member
- Open Staff and edit the person you want to invite.
- Enter their email address in the Portal email field.
- Choose an access level — see below.
- Click Send invite. They'll receive an email with a link to set a password.
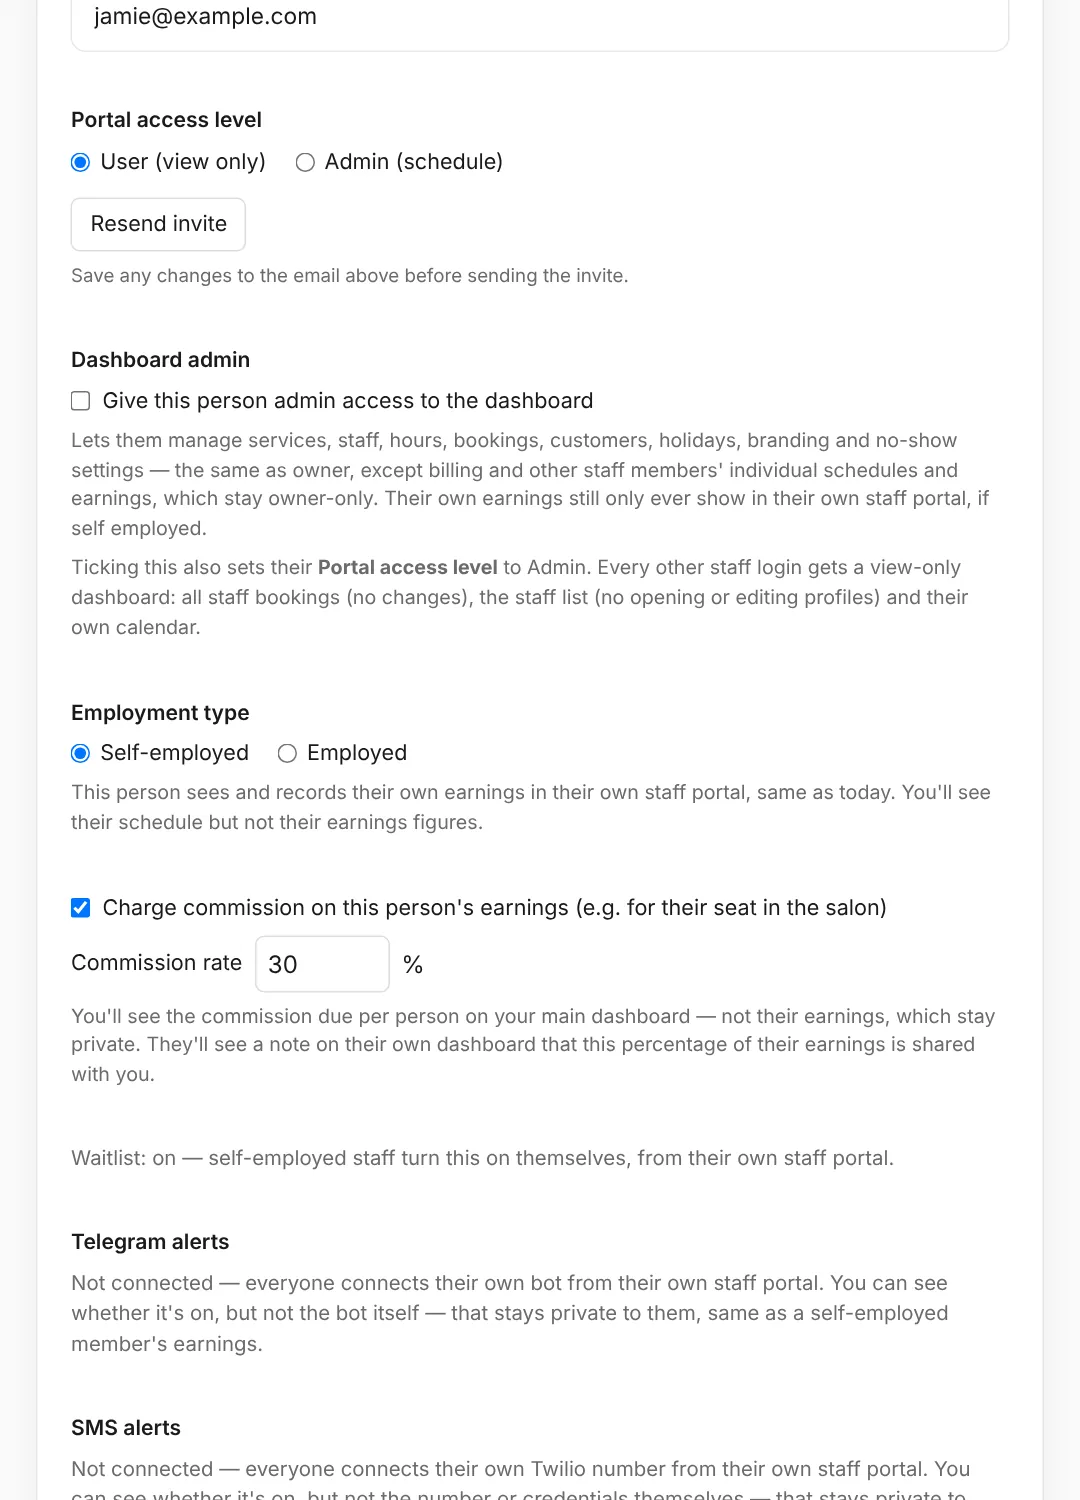
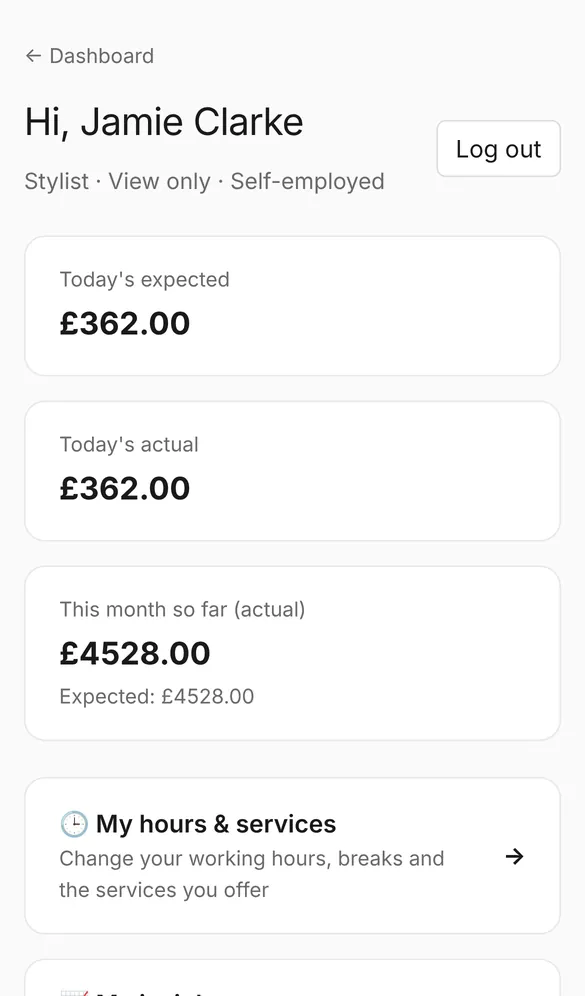
Once they've set a password, they log in at the same yourshop.trimbooking.co.uk/login page as you. They land on the dashboard — the full one if you've made them a dashboard admin, otherwise a view-only one (see section 7) — and their own staff portal is one tap away (My portal on their own card on the Staff page).
Portal access level
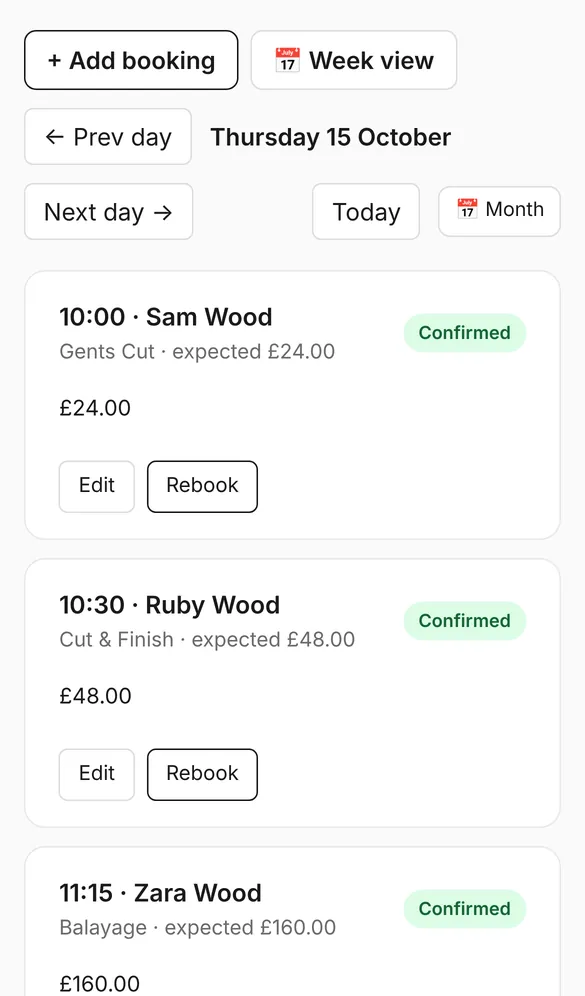
- User (view only) — sees their own bookings and earnings (today and month-to-date, expected vs. actual).
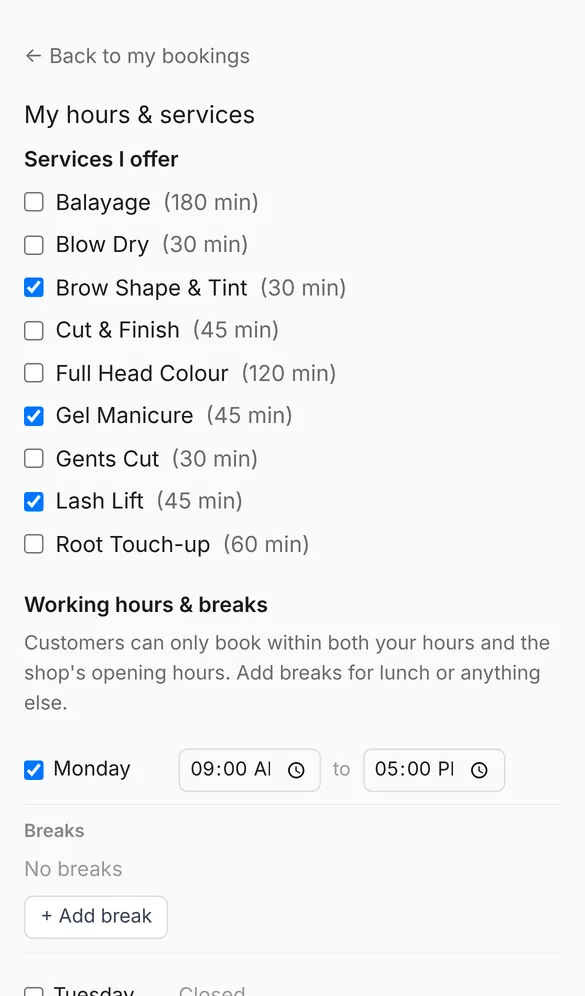
- Admin (schedule) — also manages their own working hours, breaks and services, and records the payment taken for their own bookings.
Whatever their access level, every staff member can add, edit, rebook and cancel bookings — their own from their portal or My bookings, and anyone's from the Bookings calendar (see section 7). A dashboard admin always has Admin (schedule).
Hours & services
Self-employed staff always manage their own working hours, breaks and the services they offer, from My hours & services in their portal. Employed staff can too if their access level is Admin (schedule); otherwise you manage them from the Staff page.
Commission for self-employed staff
If a self-employed team member pays for their seat in the salon as a percentage of their takings, edit them on the Staff page, tick Charge commission and set the rate. Your Insights page then shows a 💷 Commission due panel at the top — this month or last — with just the commission amount per person (their earnings stay private to them). Only you, the owner, see it. They see a note on their own dashboard that this percentage of their earnings is shared with you, with the amount so far this month.
Employed staff: the owner dashboard additionally shows their full schedule and earnings, and their revenue is included in your Insights "by team member" table — the way it works for the rest of your business. An employed staff member no longer sees money in their own portal; their schedule is managed from your dashboard instead.
You can resend an invite at any time (for example if the link expired), and you can remove a staff member's access entirely by deleting them from the Staff page. Employed staff don't see money anywhere in their portal, and don't get My insights or direct payouts — the shop pays them.
My insights
Staff members have a My insights link in their portal. It's the same Insights view (see section 7) built only from their own bookings: their takings, best week, top clients, regulars they haven't seen in 3 months and their busy and quiet times. Only they can see it.
Getting paid directly (Stripe, self-employed)
From their own portal, a self-employed staff member can click Set up payouts to connect a Stripe account in their own name. The service itself is still always paid in person — that isn't changing — but if no-show protection is turned on (see below) and a customer doesn't show up, a charged no-show fee is paid straight to that staff member's own connected account, rather than always settling up with you separately.
7. Who can see and do what
Everyone logs in at the same yourshop.trimbooking.co.uk/login page. What they see depends on who they are:
You, the owner
Everything: every dashboard tile, billing, commission, everyone's profiles, and each employed staff member's earnings.
Dashboard admins
Tick Give this person admin access to the dashboard on a staff member's profile and they get the full dashboard: services, bookings, customers, opening hours, holidays, branding and no-show settings — the same as you, except:
- billing, Commission due and other staff members' earnings stay owner-only;
- they can add new staff and edit their own profile, but can't open, change or remove anyone else's;
- employment type, commission and portal access level can only be changed by you.
Ticking it also sets their portal access level to Admin (schedule).
Everyone else on your team
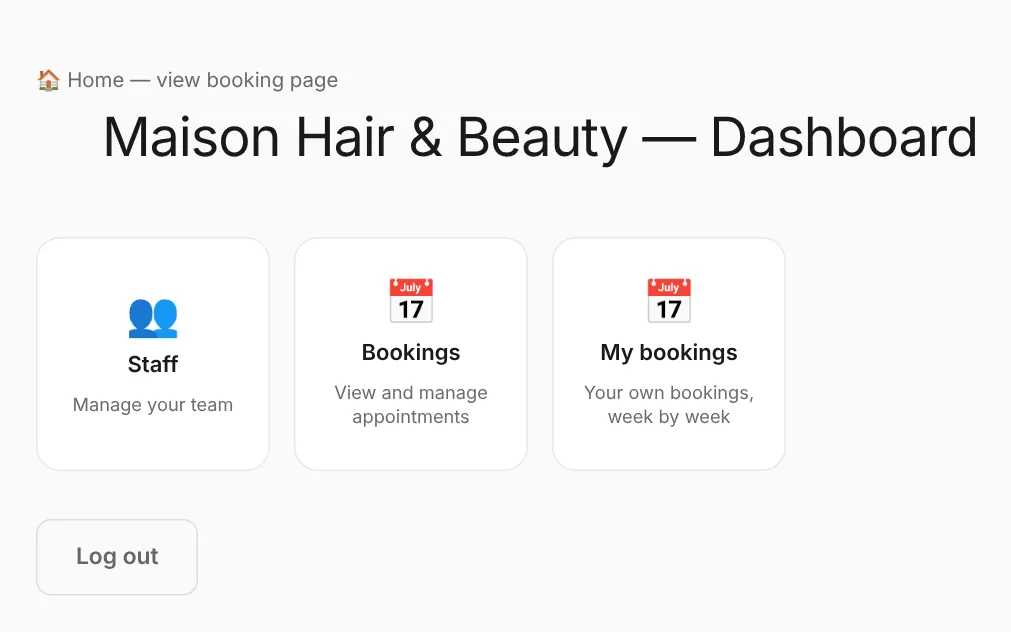
Every other staff login gets a view-only dashboard with three tiles:
- Staff — the team list. Calendar on anyone's card shows their bookings; My portal on their own card opens their staff portal. They can't open or edit anyone's profile.
- Bookings — the whole shop's calendar. They can add, edit, accept or decline, suggest another time, rebook, cancel and mark no-shows for any booking. What was paid stays hidden.
- My bookings — the same calendar, filtered to just them.
8. Managing bookings
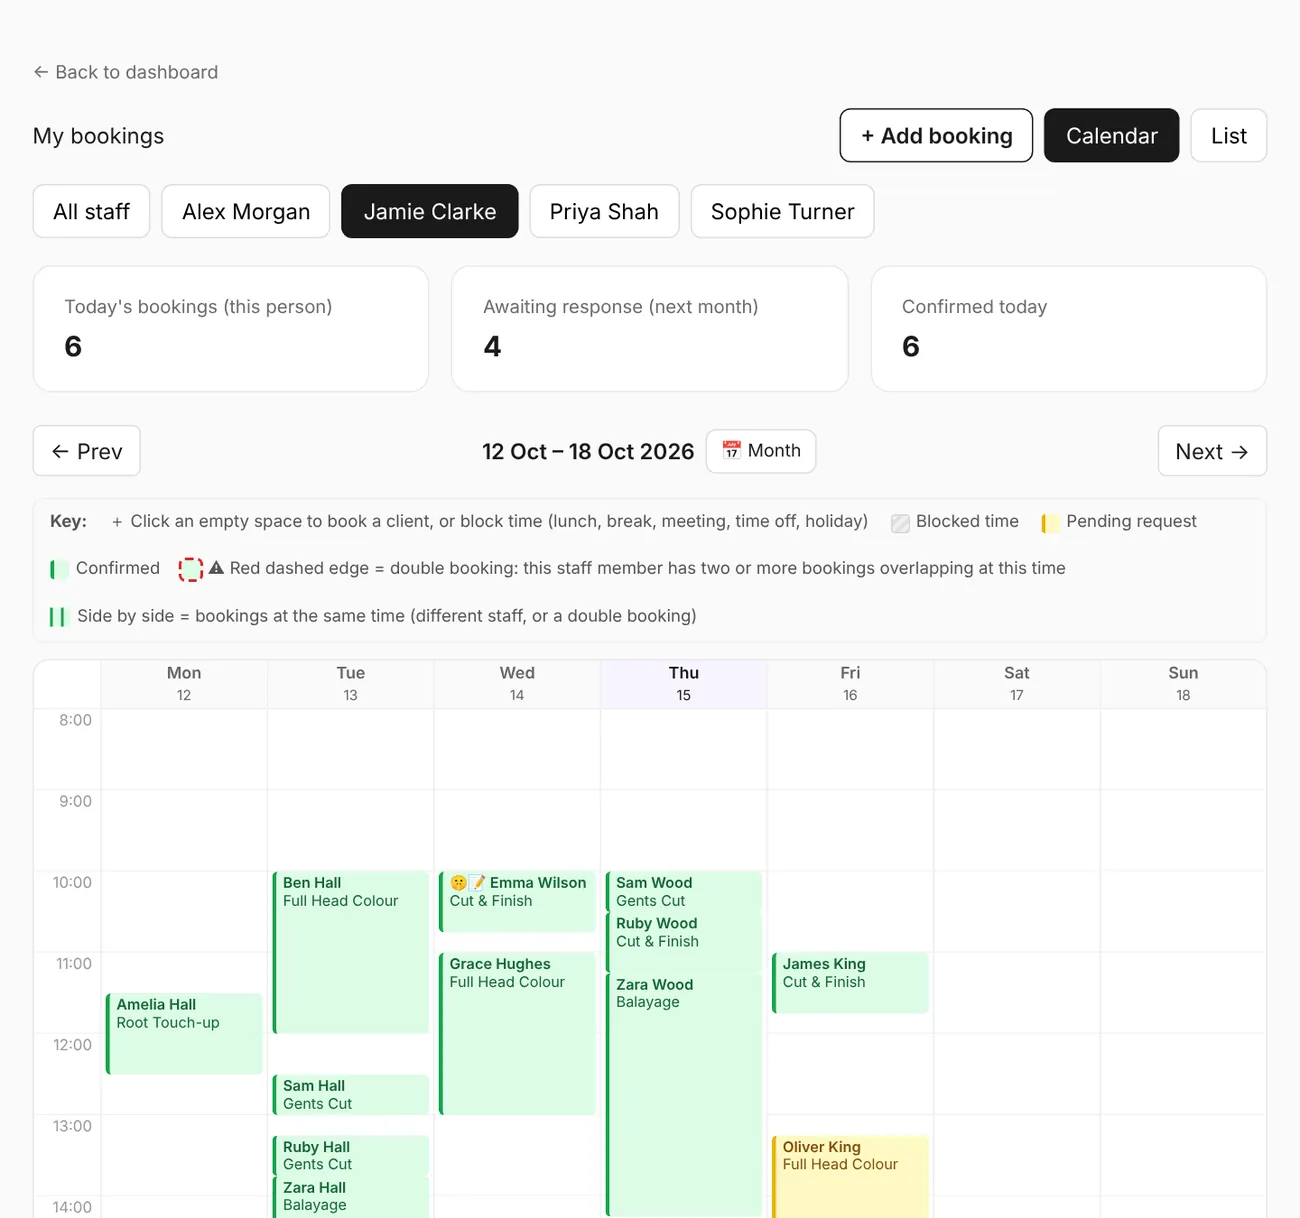
New bookings from your public page arrive as pending requests in Bookings. Choose All staff or one person along the top, switch between Calendar and List, and move week by week (or jump with 📅 Month). Every calendar in TrimBooking — My bookings, and the Calendar button on a staff card — is this same calendar, filtered to one person, so it works the same everywhere.
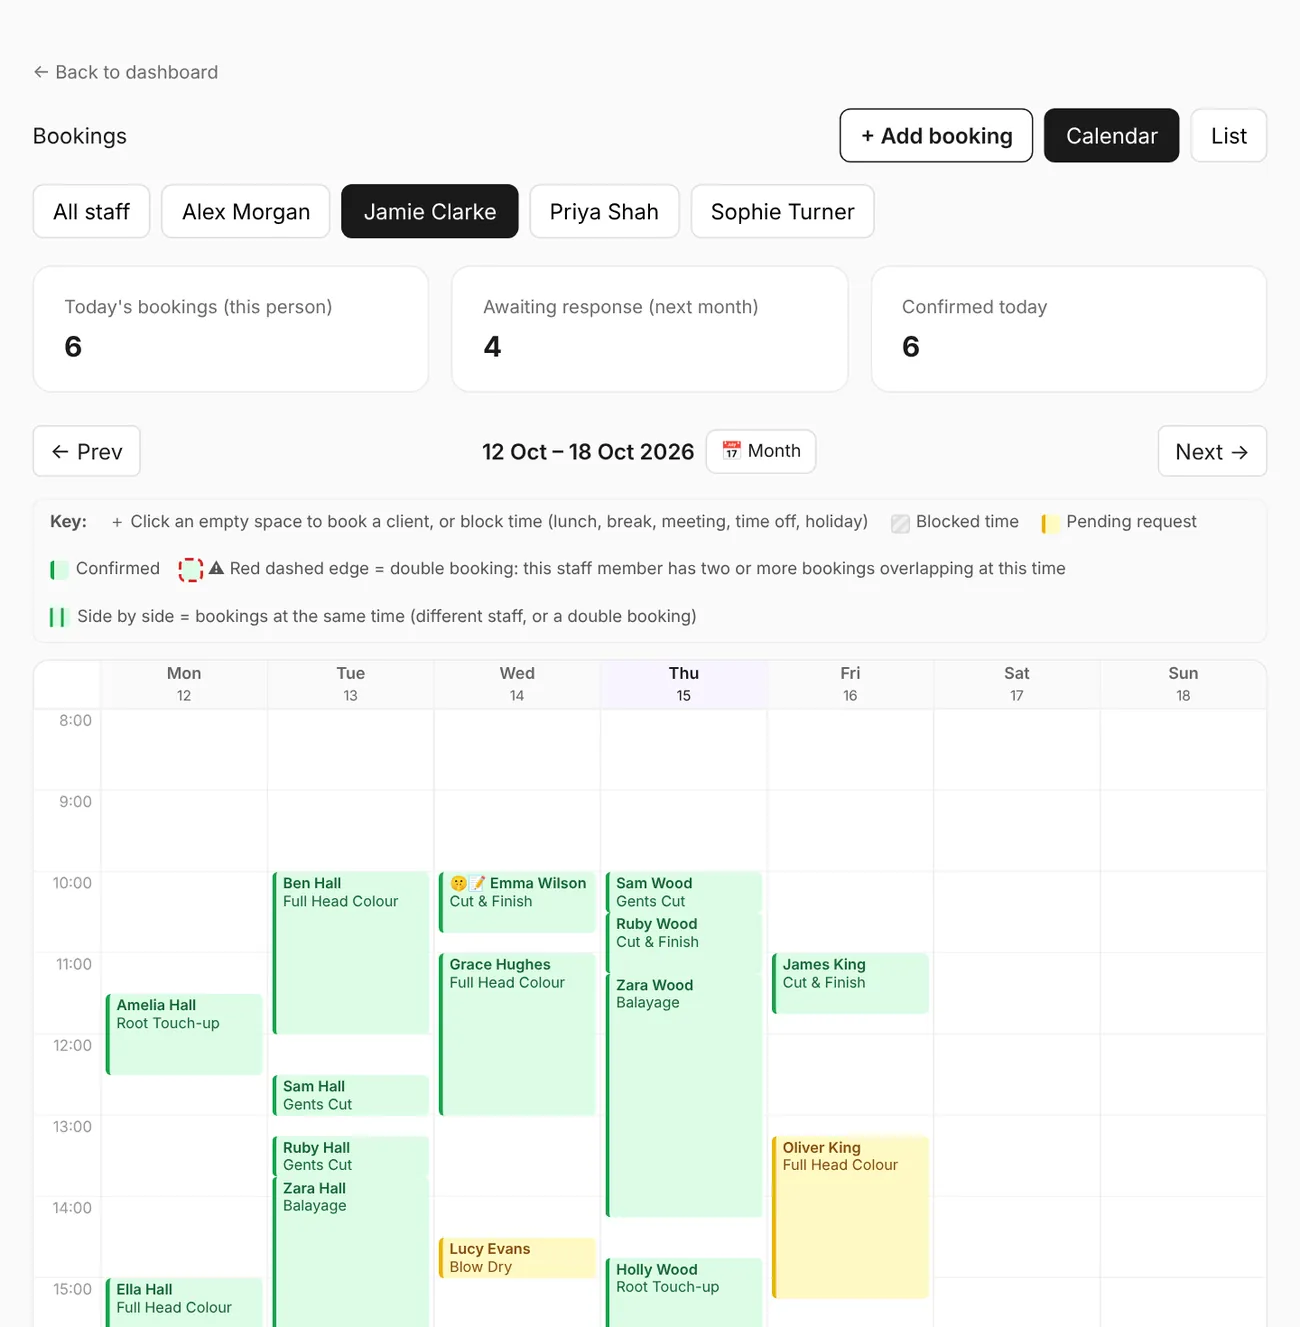
From the calendar or list you can:
- Confirm a booking — the customer gets a confirmation email.
- Decline a booking — the customer is notified so they can rebook elsewhere.
- Reschedule a booking to a new time — the customer is emailed the new details.
- Cancel a booking — from the booking pop-up, or Cancel booking at the bottom of Edit booking.
- Edit a booking — opens the same form as Add a booking, filled in, so you can change the customer's name, email or phone, the staff member, the service, or the date and time. If the date, time, service or staff member changes, tick the box to email the customer the new details (a confirmed booking gets a fresh confirmation). The booking keeps its status.
Customers are only ever offered times that don't clash with an existing booking, a break or blocked time.
If you'd rather a staff member's bookings didn't need your approval at all, turn on auto-confirm for them on the Staff page — their bookings are then accepted the moment a customer requests them.
Clicking a booking
Click any appointment on a calendar to open its details:
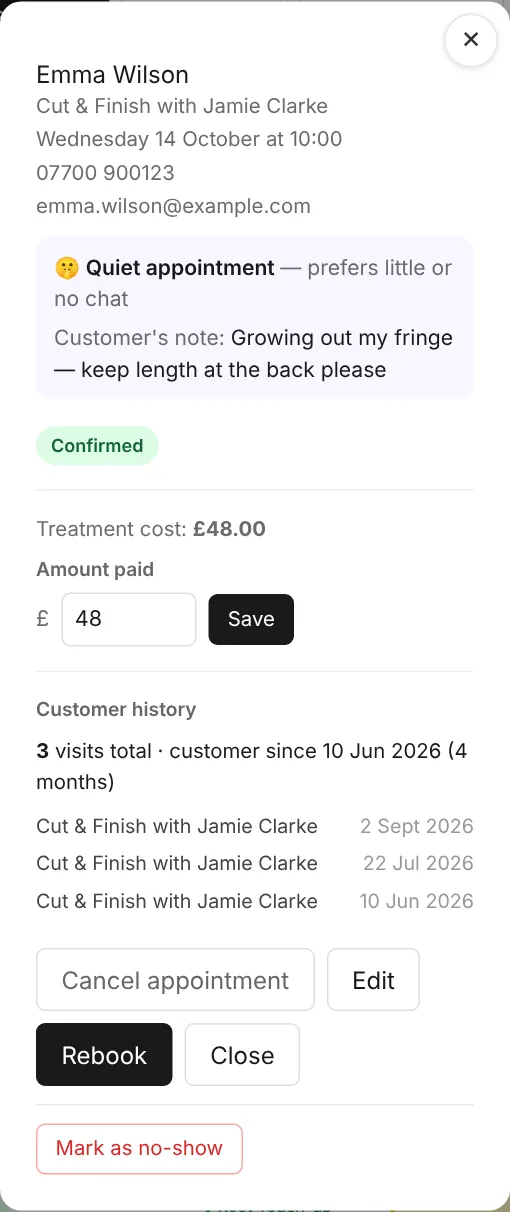
- Notes, quiet appointment and attachment — anything the customer told you when booking, and any photo or document they added.
- Treatment cost — the price of the service booked.
- Amount paid — enter or correct what was actually taken for this appointment, for example if you took payment yourself.
- Customer history — their last few visits with dates and treatments, how many visits they've had in total, and how long they've been a customer.
- Buttons — Accept, Decline or Suggest another time (for requests); Cancel appointment, Edit, Rebook and Mark as no-show (once the time has passed).
This is all scoped to the one booking and customer you've opened — it's not a running earnings total, which stays on each staff member's own portal as described above. Amount paid is shown to you and dashboard admins only.
Adding a booking yourself (phone bookings)
Click + Add booking on the Bookings page or in a staff portal. Enter the customer's details, choose the service, then either pick a free slot or choose any time by typing a date and time. The booking is confirmed straight away and the customer is emailed if you gave an address. You can also simply click an empty space on a calendar (the Bookings calendar or a staff member's calendar) and choose what to add at that day and time:
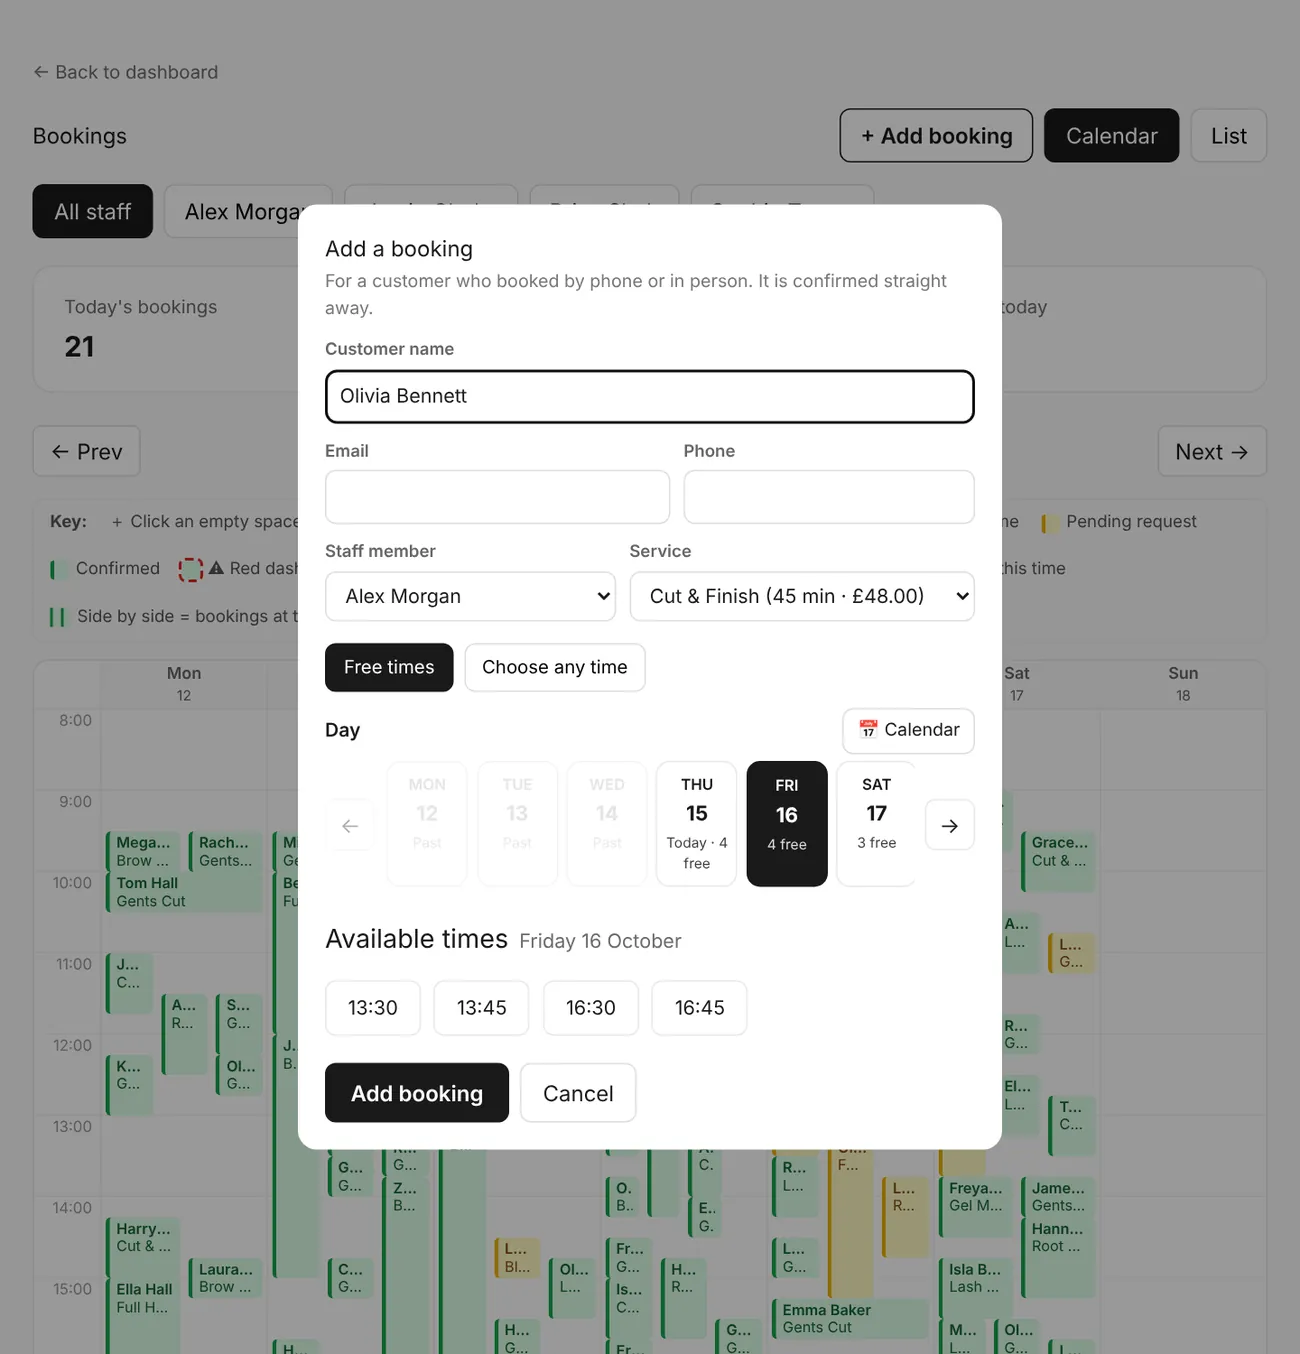
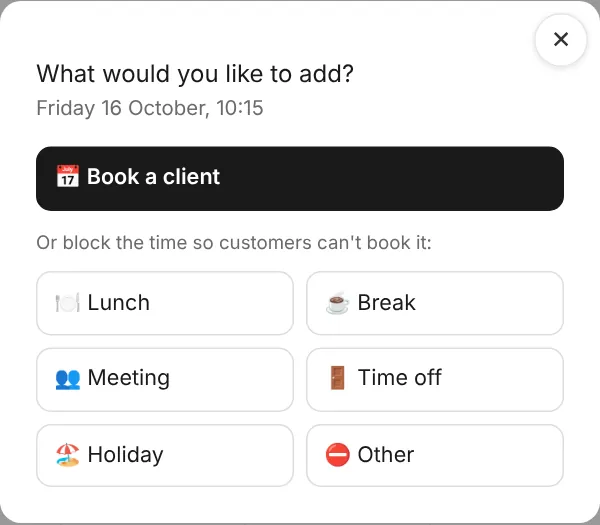
- 📅 Book a client — opens the booking form already set to that day and time.
- 🍽️ Lunch, ☕ Break, 👥 Meeting, 🚪 Time off or ⛔ Other — blocks that time for the chosen staff member (adjust the start and end, add a note if you like). It shows as a shaded box on the calendar and customers can't book over it. Click the box to see it or Remove it.
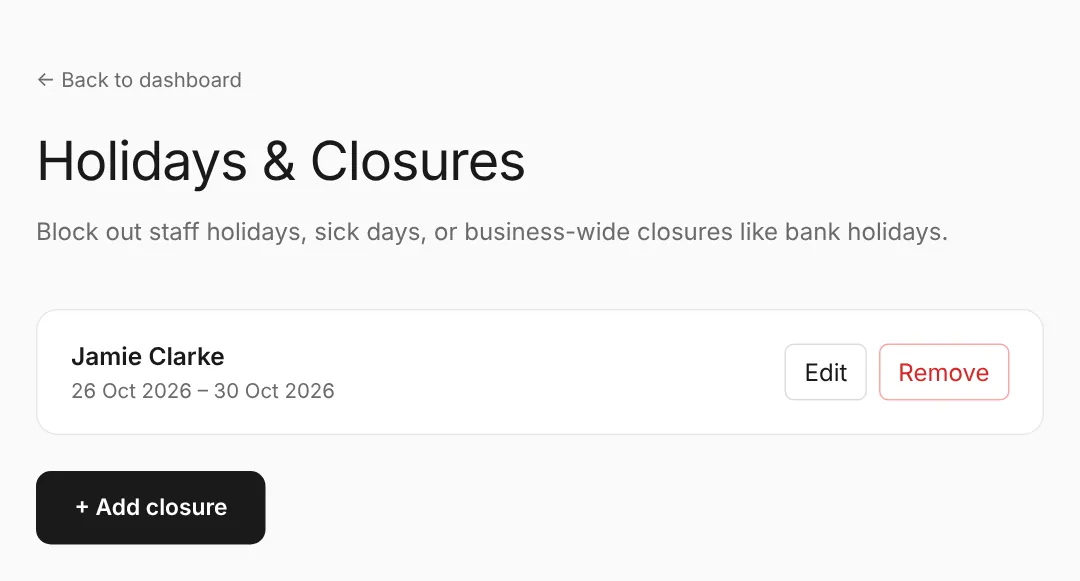
- 🏖️ Holiday — whole days off for one person, or Whole shop (closed); it's added to your Holidays list.
For breaks that happen every week (a daily lunch, say), set them once under each person's working hours instead.
Editing or cancelling a booking
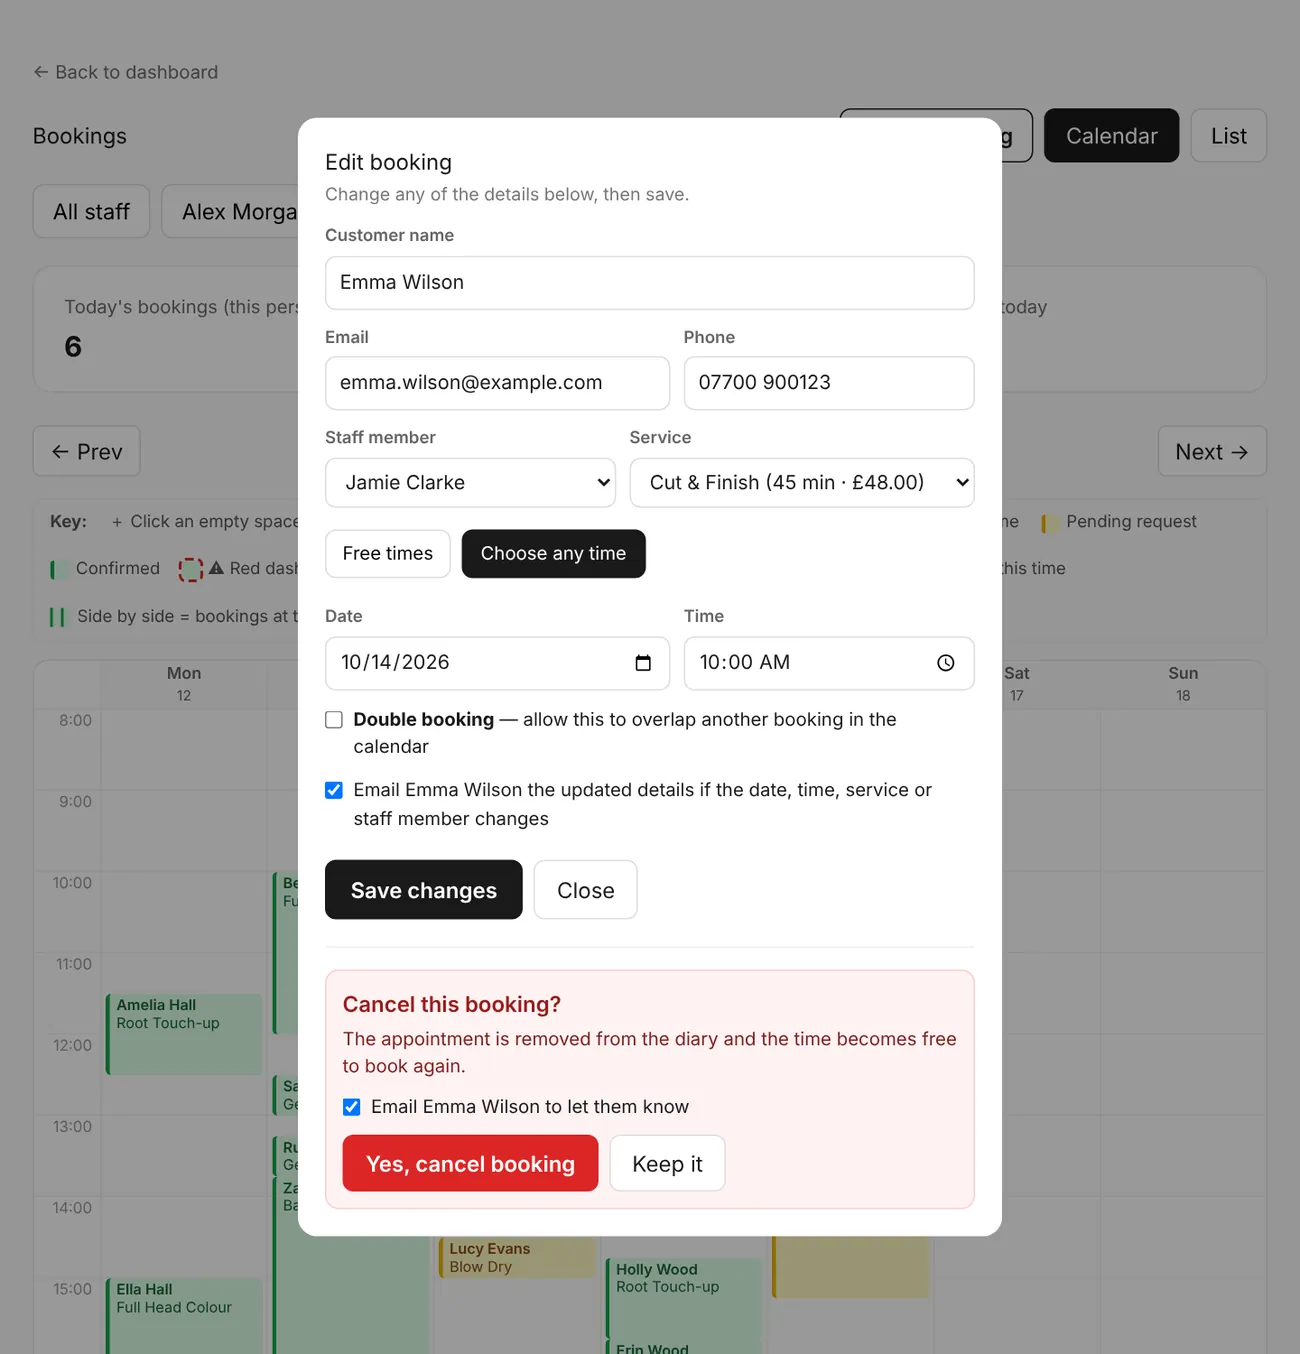
Tap Edit on a booking — in the booking pop-up on any calendar, or on the booking in a staff portal. The same form as Add a booking opens, filled in, so you can change the customer's details, the staff member, the service, or the date and time, then Save changes. To call it off instead, tap Cancel booking at the bottom, confirm with Yes, cancel booking, and choose whether to email the customer. The time becomes free to book again.
Double bookings
If a typed time overlaps another booking you'll be warned. Tick Double booking to allow it anyway. Overlapping appointments are shown side by side on the owner calendar, with a red dashed outline and a ⚠ when they're for the same staff member. A key above the calendar explains the colours and outlines.
Rebooking a customer
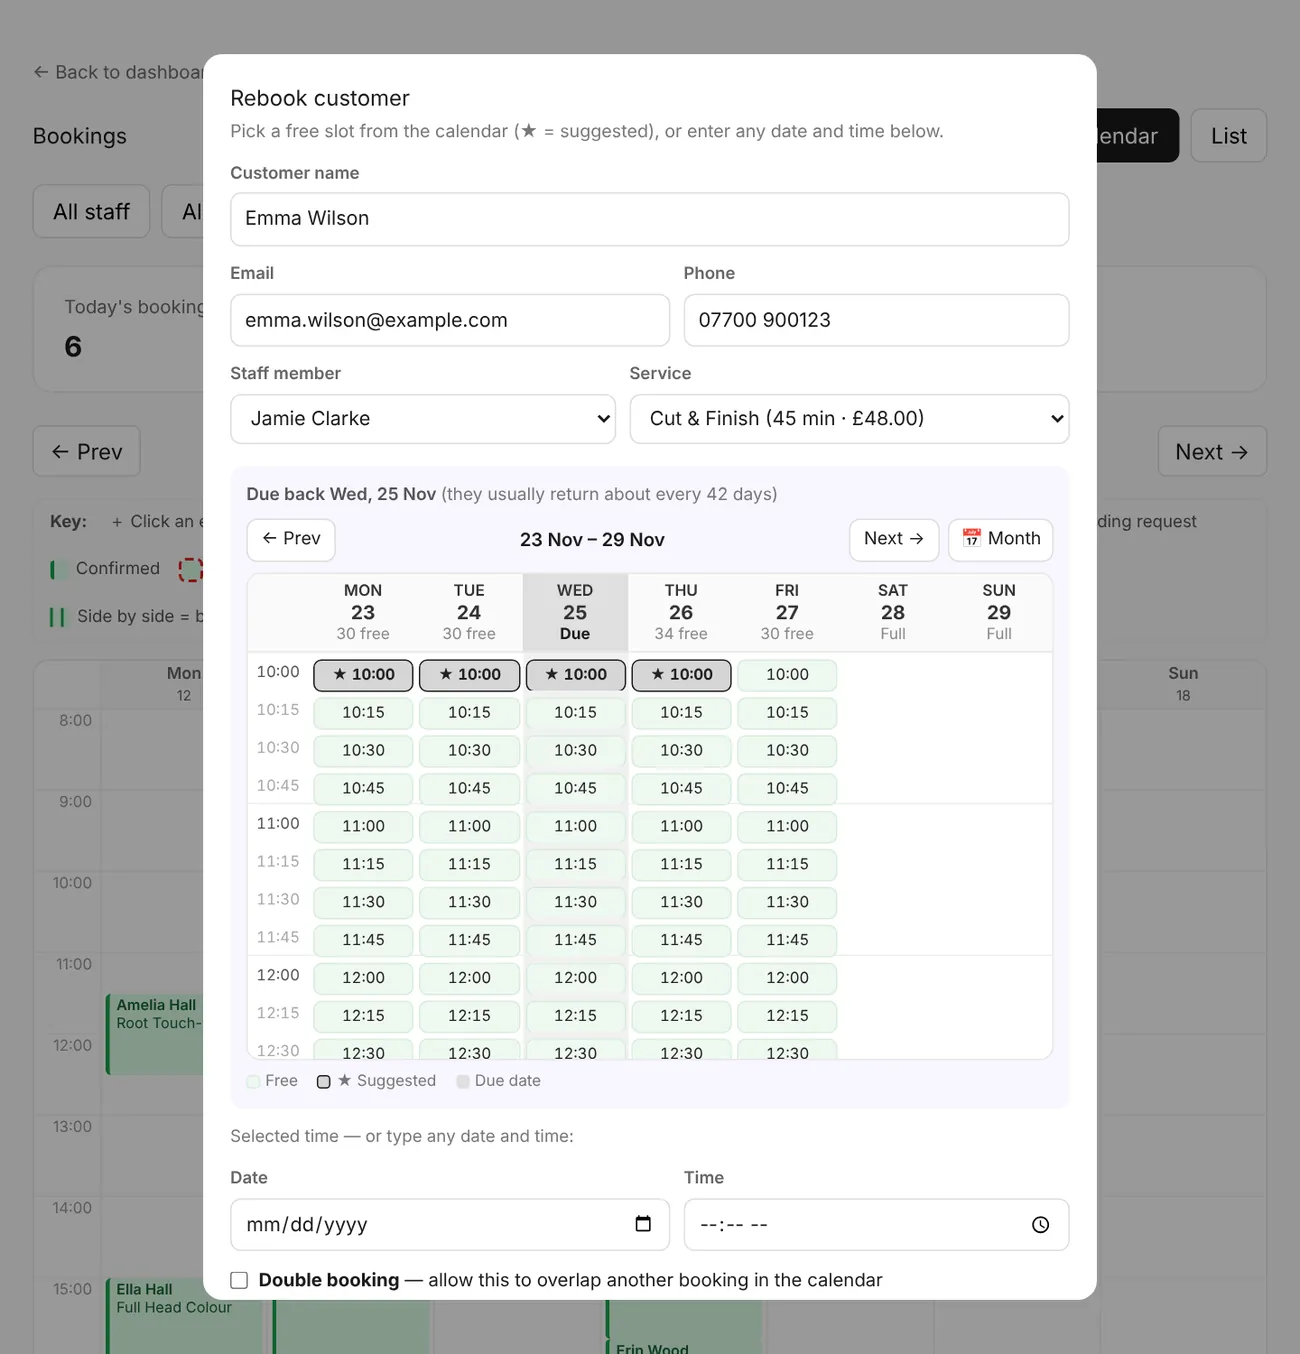
Click Rebook on a booking (the booking pop-up on any calendar, or a card in the staff portal). It opens a week calendar of that staff member's free slots for the chosen service, on the week the customer is due back — worked out from how often they usually visit (six weeks if there's no history yet). The due day is shaded, and the best matches are starred ★: the days nearest the due date, at the time of day they usually come in. Use ← Prev week and Next week → to look further around (it won't go back before this week), 📅 Month to jump straight to any date on a month calendar, and Back to suggested week to jump back. Click any free slot to fill in the date and time, or type any date and time yourself — tick Double booking if it overlaps another booking on purpose. The thank-you email sent the day after a visit also has a Rebook button for the customer.
After you save a rebook (or add a booking by hand), the pop-up shows a ✅ confirmation of exactly what went in — the day, date, start and end time, customer, service and staff member — so there's no need to go and check the diary. Tap Done to close it. Every date picker (the booking page, rebooking, the Bookings calendar and staff diaries) also has a 📅 button that opens a month calendar, alongside the week-by-week arrows.
Repeat-booking alerts
If a customer has two or more bookings within 10 days, an alert appears at the top of your dashboard (and the staff portal, for that staff member's own customers). If more bookings turn up, we keep looking another 10 days from the last one. Customers are matched by name and by email separately. The alert is yellow for 2 bookings, orange for 3 and red for 4 or more. Click Review to see every booking in full, then dismiss it once checked.
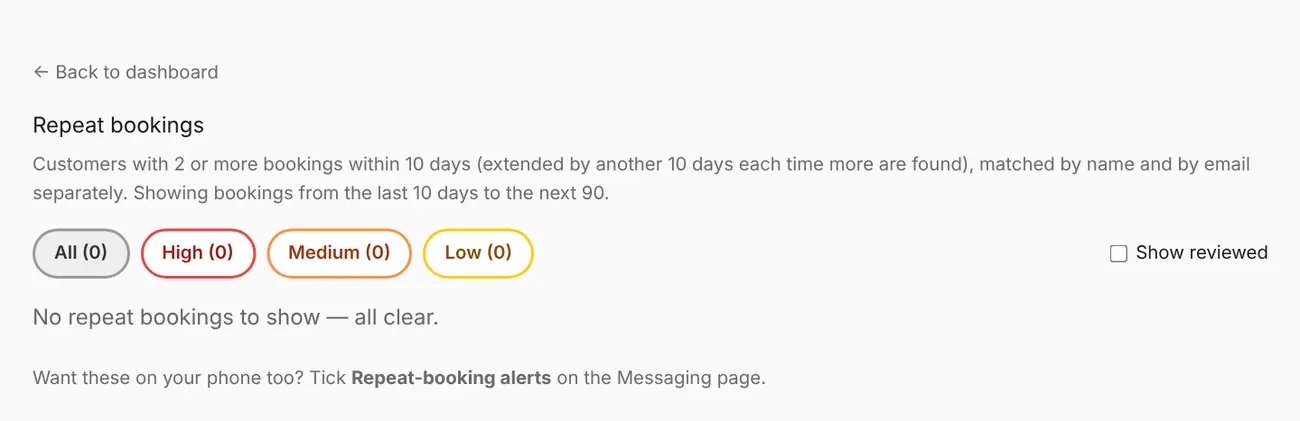
The calendar pages show a single banner linking to the full Repeat bookings page (a tile on your dashboard that shows a coloured ! badge whenever something needs reviewing; staff have their own at My bookings → Repeat bookings), where you can filter by priority and mark alerts as reviewed. Tick Repeat-booking alerts on the Messaging page to get them on Telegram, SMS or WhatsApp too.
9. Insights
Open Insights from your dashboard to see how the business is doing. Pick a period at the top:
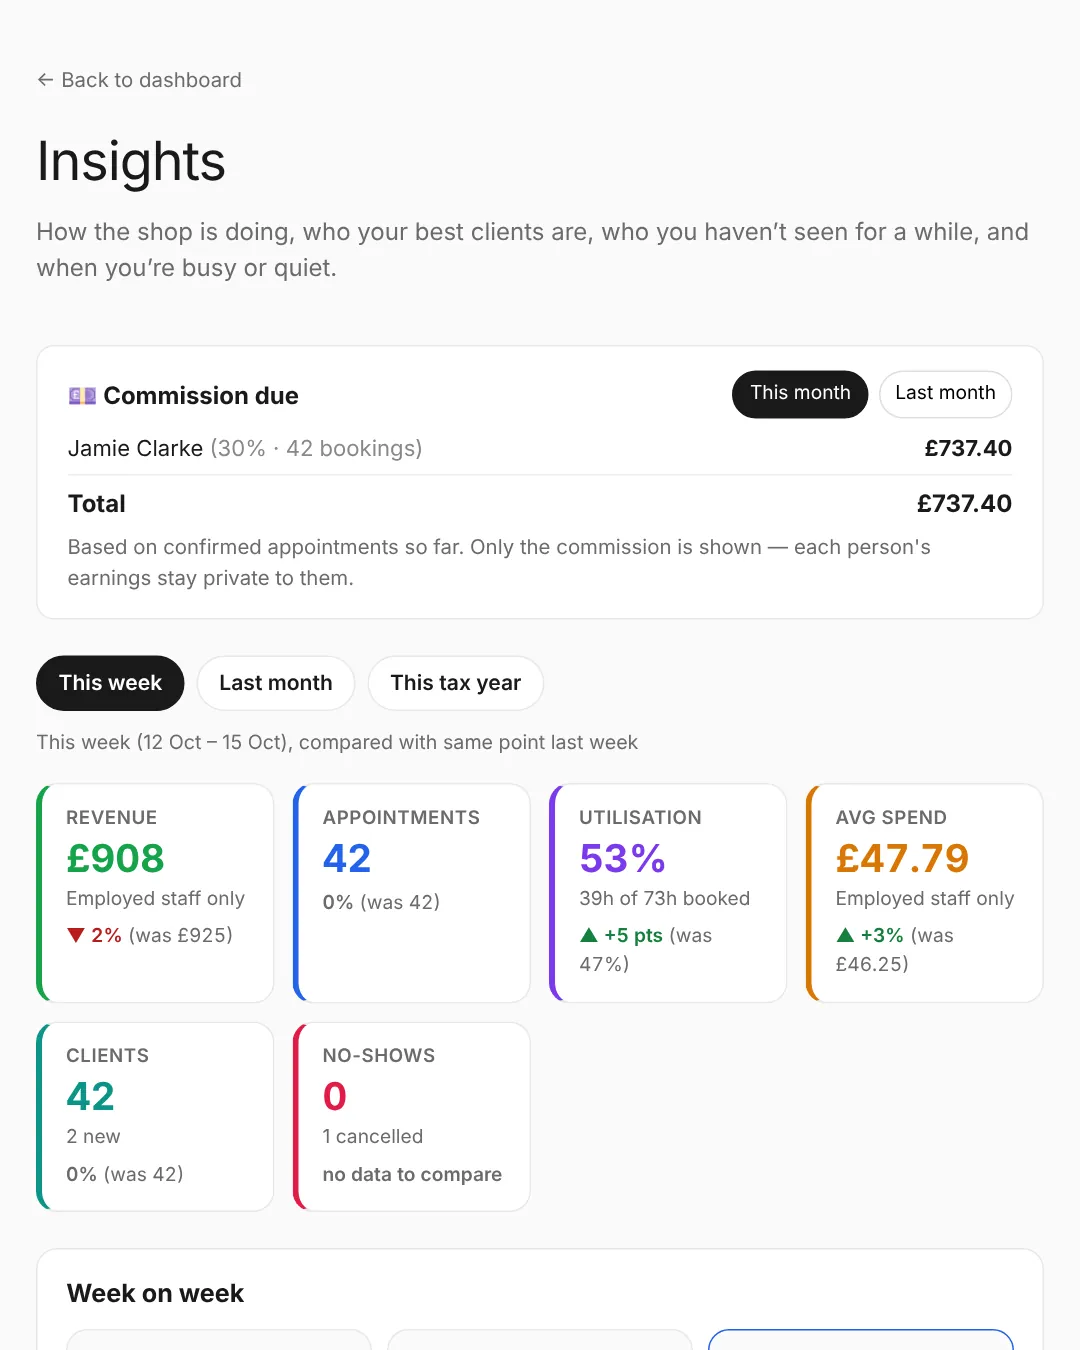
- This week — Monday to now, compared with the same point last week.
- Last month — the whole of last month, compared with the same month last year.
- This tax year — from 6 April to now, compared with the same point in the previous tax year.
For that period you'll see, each with a ▲ or ▼ against the comparison:
- Revenue — what was recorded as paid, or the service price where nothing different was entered, from bookings handled by employed staff only. A self-employed team member's takings are their own business, not the shop's, so they're left out of Revenue and Average spend here (Appointments, Utilisation and Clients still reflect the whole diary).
- Appointments — visits that went ahead (no-shows and cancellations aren't counted).
- Utilisation — how much of your bookable time was booked. Bookable time comes from your opening hours and each staff member's hours, minus breaks and holidays, so set those up for this to be accurate.
- Average spend, clients (and how many were new), and no-shows and cancellations.
Week on week
A chart of the last 12 weeks, this week so far against the same point last week, and your best week of the last 12 months. Tap any bar to see that week's figures.
Busy and quiet times
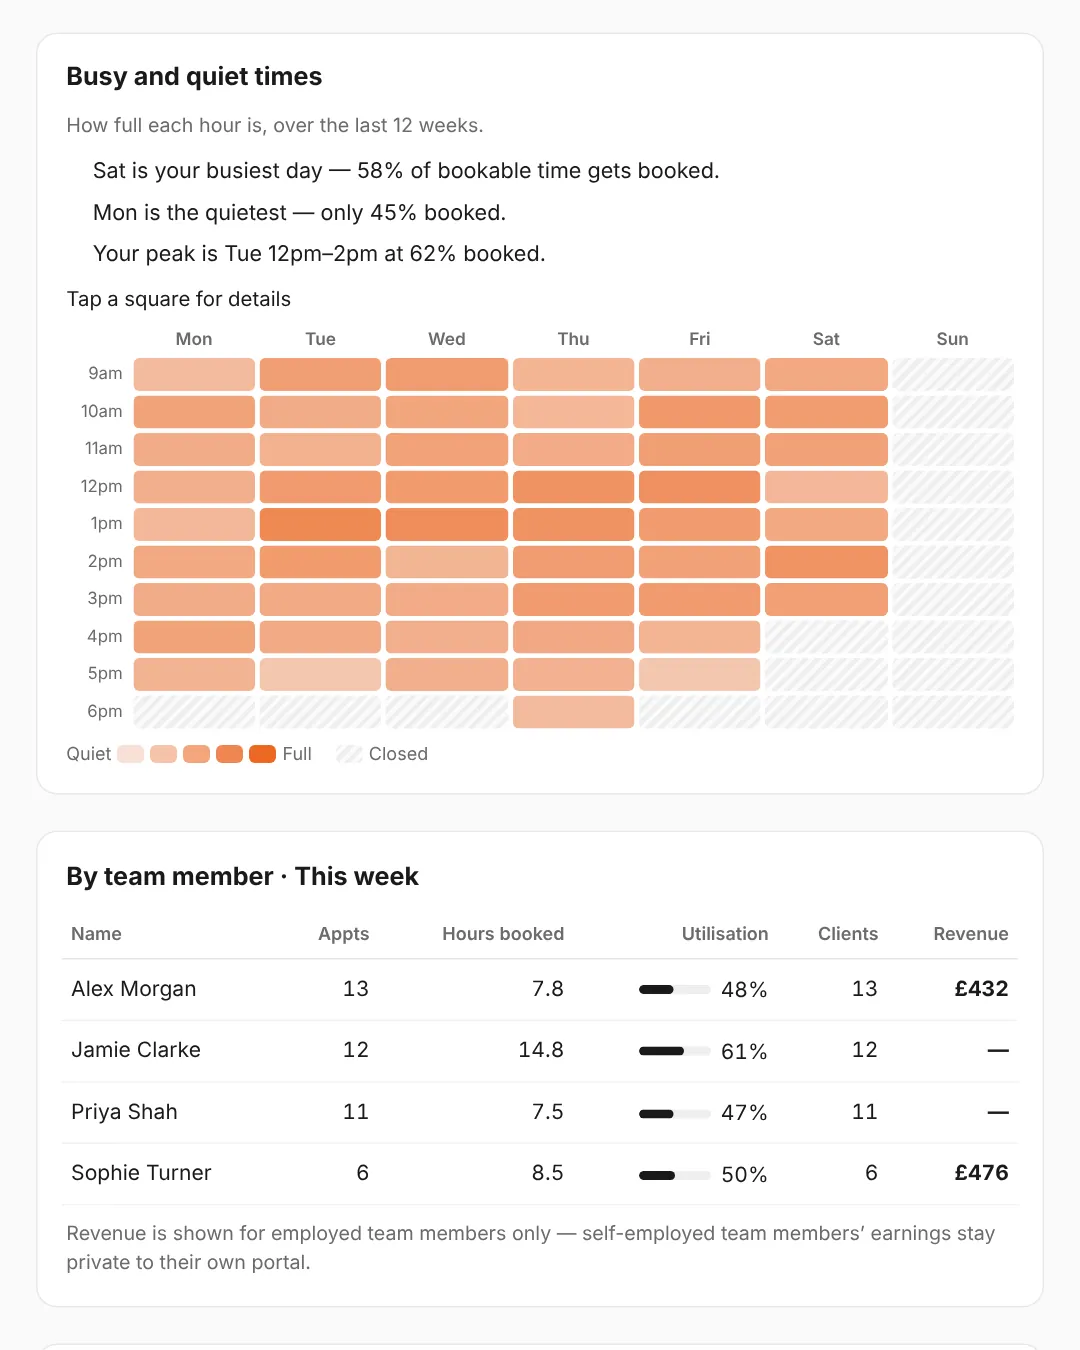
A grid of every day and hour, shaded by how full it is over the last 12 weeks, with short pointers — your busiest and quietest days, the slots that are nearly always full, and the quiet ones that might suit an off-peak offer. Tap a square for its details.
Top 10 spenders and clients you haven't seen
Top 10 spenders lists your most valuable clients this tax year. Not seen in 3 months lists clients whose last visit was over 3 months ago and who have nothing booked, most valuable first, with buttons to call or email them.
By team member, and who sees what
If you have more than one staff member, a table shows each person's appointments, hours booked, utilisation and clients. Money figures on the Insights page are shown to the owner only; admins see everything else. Within that table, an employed team member's revenue is shown alongside their other figures; a self-employed team member's earnings are never shown per person — they stay in that staff member's own portal.
The 💷 Commission due panel at the top of Insights is shown to the owner only — see Commission for self-employed staff above.
Customers
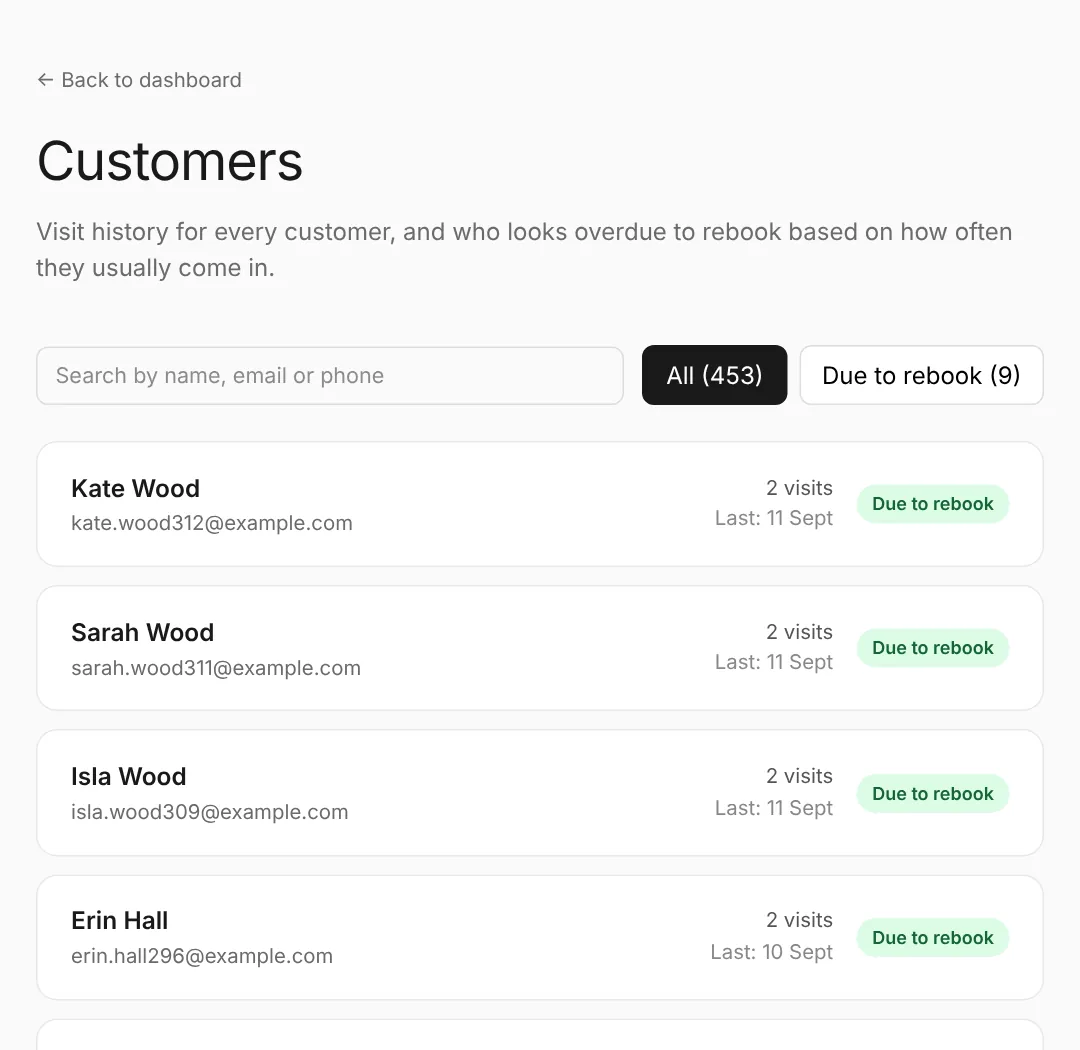
Customers on your dashboard lists everyone who has booked, with how many visits they've had, when they last came in, and who is due to rebook based on how often they usually visit.
10. How customers book & manage appointments
Customers visit yourshop.trimbooking.co.uk, choose a service and staff member, then pick from the available times. No account or app is needed.
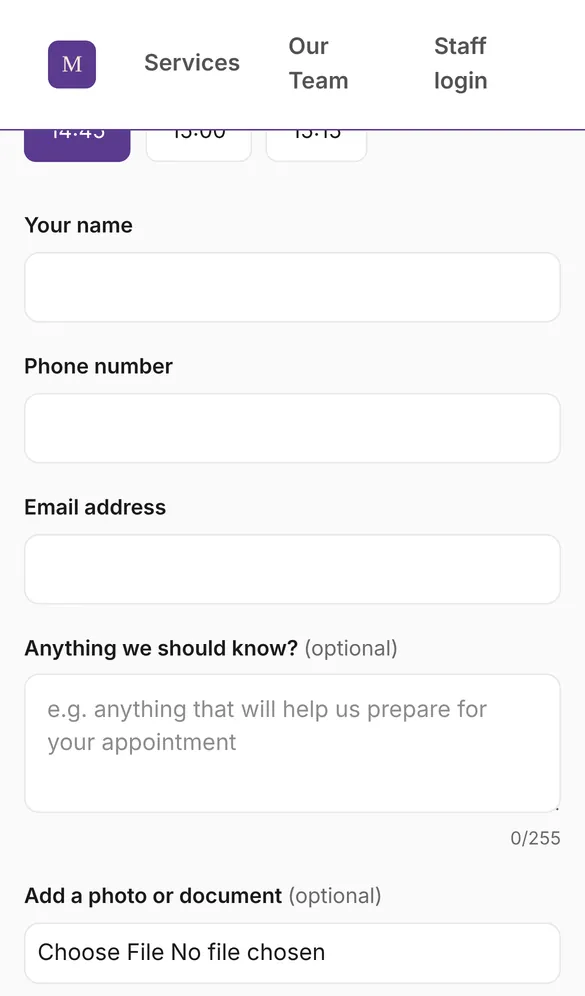
When entering their details they can also leave an optional note of up to 255 characters — anything that will help you prepare for their appointment — and tick Quiet appointment if they'd prefer little or no chat. They can also attach one photo or document — a picture of the style they'd like, or a form you've asked for. All of these show on the booking in your calendar and bookings list (🤫 for quiet, 📝 for a note, 📎 for an attachment), in the staff member's portal, and in your Telegram, SMS or WhatsApp alerts. Open the booking to see the photo or tap the file to open it. If you get booking alerts on Telegram, the photo or document itself arrives in the chat too, straight after the new-booking message (SMS and WhatsApp alerts just mention it).
Attachments are private: they're never on your public pages, and only you, your shop admins and the staff member the booking is with can open them. You can switch the quiet-appointment option and attachments off for any service on the Services page (see Choosing a staff member, price, quiet appointments and attachments above).
After booking, they receive an email confirming their request, and a follow-up once you confirm or decline it — or, if the staff member has auto-confirm switched on, their booking is confirmed straight away and they're told so immediately. Every booking email includes a personal link they can use to view, reschedule or cancel their appointment themselves, without needing to phone the business.
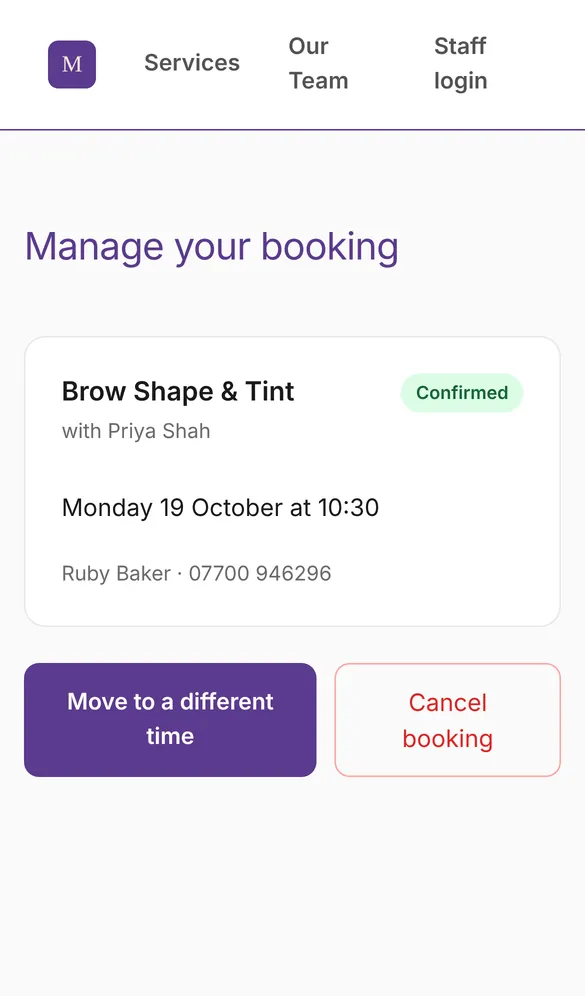
Can't do the time they asked for? Suggest another
Open a booking request in Bookings and tap Suggest another time instead of declining it. Pick a free time from the calendar, add a short message if you like ("Sorry, Tuesday is full — would Wednesday work?") and tap Offer. The new time is held for that customer straight away, and they get an email asking them to confirm it.
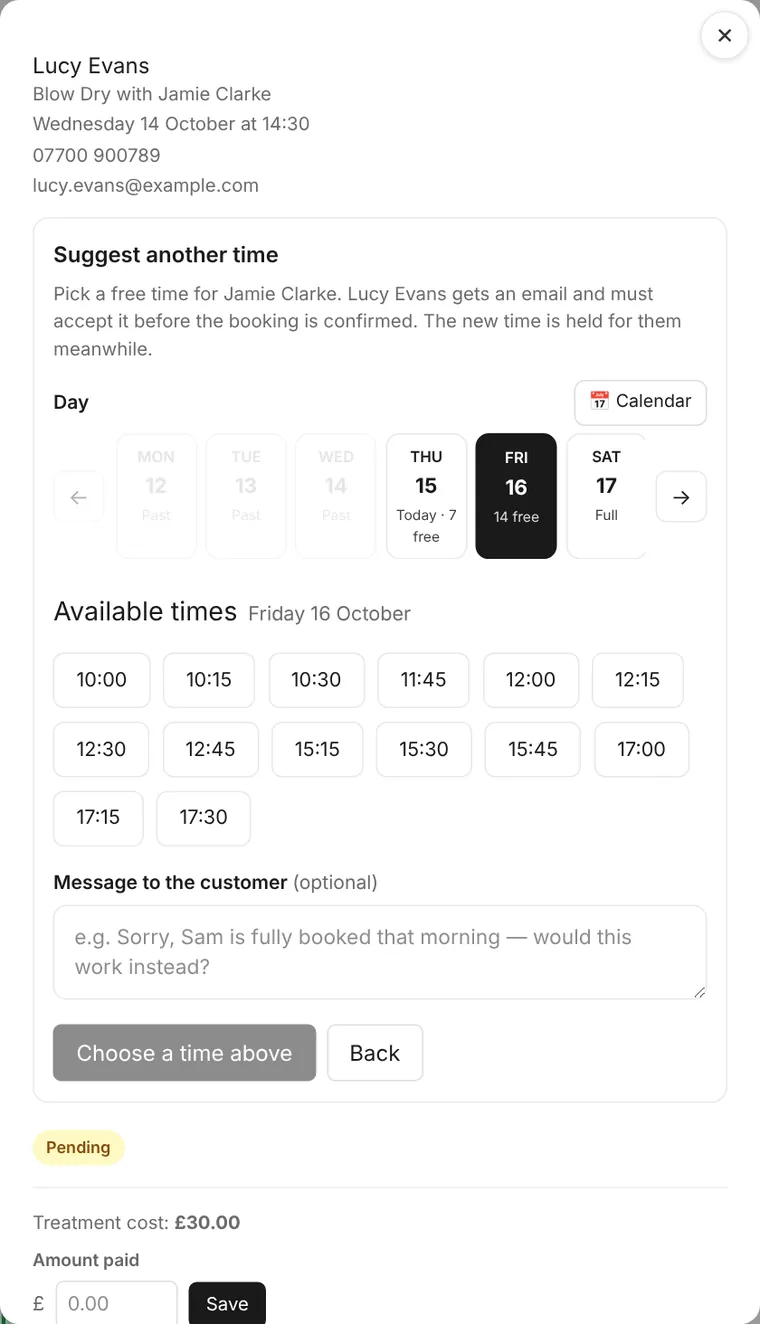
The booking stays pending — marked 🕓 New time offered — waiting for the customer — until they answer from their booking link. They can accept it (the booking is confirmed and you get a Telegram/SMS/WhatsApp alert), choose a different time themselves (it comes back to you to confirm), or decline (the booking is cancelled and you're told). While you wait you can offer a different time again, or decline the request.
11. Billing & no-show protection
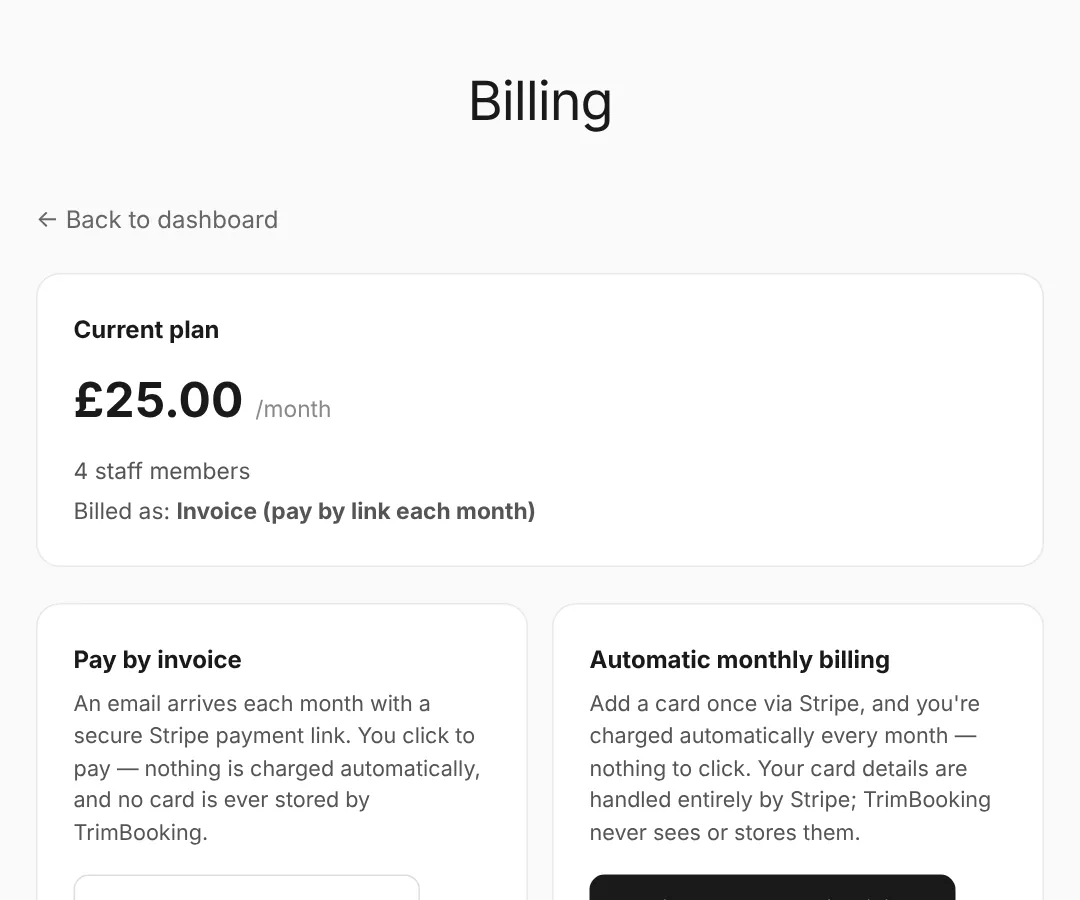
From Dashboard → Billing, choose how you'd like to pay once your free trial ends:
- Pay by invoice — the default. An invoice with a secure Stripe payment link arrives each billing period; you pay it yourself each time, and no card is ever stored.
- Automatic billing — add a card once via Stripe Checkout and it's charged automatically every month. Switch back to pay-by-invoice at any time.
If a payment is ever missed, you'll get a reminder email once a day for a 5-day grace period before your booking page is paused — plenty of time to sort it out either way.
No-show protection
Turn this on from Dashboard → No-show protection to ask customers for a card when they book — nothing is charged unless they don't show up. You choose how the fee is worked out:
- Flat fee — the same amount for any booking.
- Percentage — a % of that booking's service price.
- Per service — set an individual fee on each service, in Services.
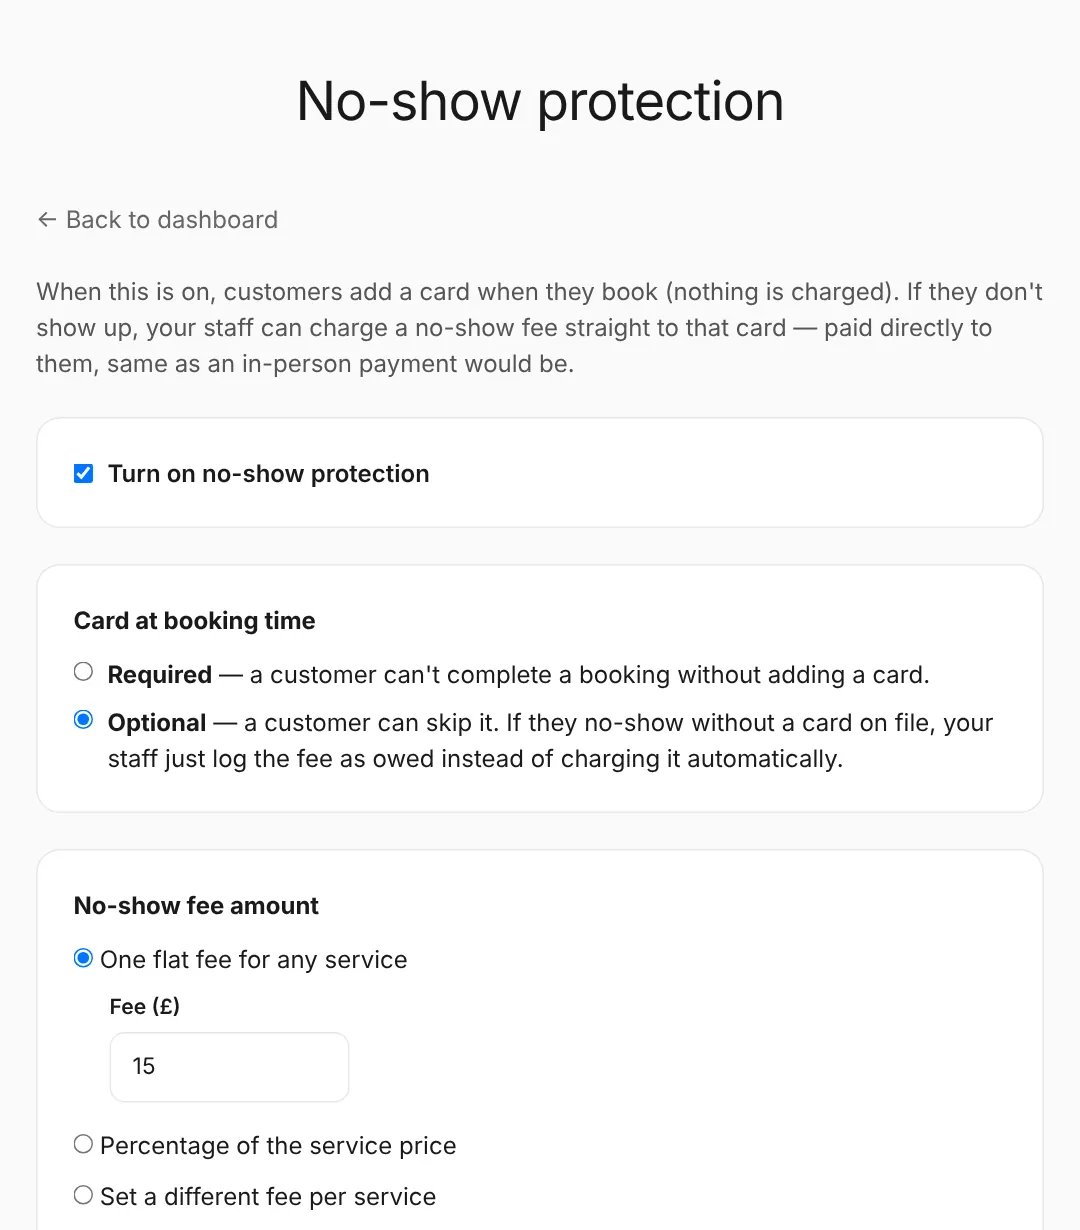
You can also choose whether a card is required to book at all, or just offered. Anyone on your team can tap Mark as no-show on a past confirmed booking (in the booking pop-up or a staff portal); the fee is worked out there and can be logged as owed. A self-employed staff member can also charge the saved card from their own portal — paid straight into their own connected Stripe account. Employed staff log the fee as owed instead.
12. Your account, login & passwords
Log in at yourshop.trimbooking.co.uk/login with the email and password you signed up with. If you've forgotten your password, click Forgot password? on the login page and you'll be emailed a reset link.
Own more than one business? From Dashboard → Other businesses, click + Add another business to set up a new shop under your current login — no separate email or password needed. The same page lists every TrimBooking business linked to your login, whether you own it or are staff there, with a link straight to each one. If you're staff somewhere and want to remove yourself from it, you can do that from the same list (staff reach the equivalent page from their own portal).
13. Messaging: Telegram, SMS & WhatsApp
All found in Dashboard → Messaging. There are two separate kinds, which serve different audiences and are set up independently of each other:
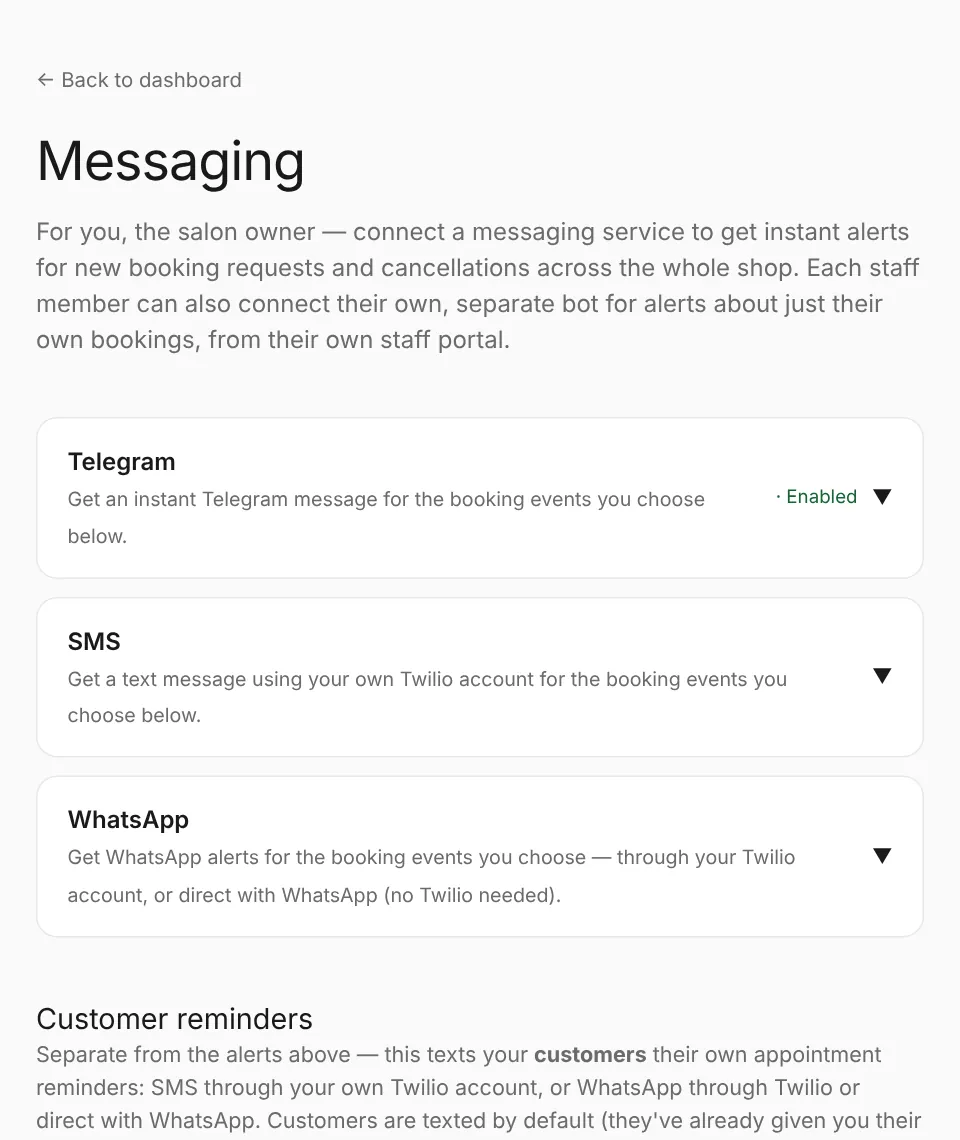
- Alert the shop — an instant Telegram, SMS and/or WhatsApp message to you (and optionally each staff member, about just their own bookings) when a booking is requested, confirmed, due a reminder, or cancelled — or when a customer has several bookings close together.
- Text your customers — SMS and/or WhatsApp reminders sent to your customers themselves, 1 week and/or 1 day before their appointment.
Alerting yourself (and staff) — Telegram
Free, and the quickest to set up:
- Open Telegram and search for @BotFather.
- Send it
/newbotand follow the prompts to name your bot. - Copy the token it gives you and paste it into the Telegram card on the Messaging page.
- Telegram only lets a bot message someone who's messaged it first — so open a chat with your new bot and send it anything, then click Finish connecting.
- Tick which events should alert you (new requests, confirmations, reminders, cancellations), and send a test message.
Each staff member can connect their own bot the same way from their own staff portal, for alerts about just their own bookings — you can see whether they've connected one, but never the bot itself, same privacy boundary as a self-employed member's earnings.
Alerting yourself (and staff) — SMS
Uses your own Twilio account — Twilio bills you directly for each text; TrimBooking never sees or marks up that cost.
- Sign up at twilio.com and buy a phone number that can send SMS (a UK number is simplest for UK texts).
- From the Twilio console homepage, copy your Account SID and Auth Token.
- In the SMS card on the Messaging page, paste those plus your Twilio number, and the mobile number alerts should land on.
- Tick which events should text you, and send a test message.
Alerting yourself (and staff) — WhatsApp
Open the WhatsApp card at the top of the Messaging page, choose how to send (see Setting up WhatsApp below — direct with WhatsApp, or through Twilio), enter your details and the WhatsApp number alerts should go to, then tick which events you want and send a test. Staff can do the same from their own staff portal (Enable WhatsApp updates) for alerts about just their own bookings.
WhatsApp only delivers messages a business starts if they use a template Meta has approved, so alerts need their own template with 2 variables — submit it under the Utility category with this text:
Sample values for Meta's review: {{1}} = Jane's Salon, {{2}} = New booking request: Sarah, Haircut with Alex, Fri 10:30.
Texting customers — SMS
Same Twilio account as above (or a different one), but a separate section — "Customer reminders" — further down the Messaging page, since it's a different audience with its own consent rules:
- Paste your Twilio Account SID, Auth Token and from-number into the Customer SMS reminders card.
- We'll try to automatically set that Twilio number's inbound-SMS webhook so a customer replying STOP actually opts them out. If that fails (shown in the connection result), set it manually in your Twilio console — open the number's settings and set "A message comes in" to a webhook pointing at your TrimBooking address's
/api/webhooks/twilio/inboundendpoint, method POST. - Choose whether to send the 1-week-before reminder, the 1-day-before reminder, or both.
- Enter a phone number and send yourself a test, to see exactly what a customer will receive.
Texting customers — WhatsApp
Open the Customer WhatsApp reminders card under Customer reminders, choose how to send (see Setting up WhatsApp below), choose which reminders to send, and send yourself a test. The reminder template needs exactly 4 variables in this order — submit it under the Utility category (it's a transactional appointment reminder, not marketing):
Sample values for Meta's review:
{{2}} = Sarah
{{3}} = Haircut with Alex
{{4}} = tomorrow, Tuesday 2:00pm
Meta won't approve a template that starts or ends with a variable, which is why the wording above begins with "Reminder from". If you set up WhatsApp before this guidance and your template is already approved, it keeps working — the variables are in the same order.
Setting up WhatsApp: two ways to connect
Every WhatsApp card on the Messaging page (and in the staff portal) lets you pick how messages are sent. Either way needs a one-off approval from Meta, so allow a day or two the first time.
- Direct with WhatsApp — your own WhatsApp Business number through Meta's free WhatsApp Cloud API. No Twilio account needed, and Meta bills you directly per message sent. Best if you only want WhatsApp.
- Through Twilio — a WhatsApp sender in your Twilio account. Best if you already use Twilio for SMS and want everything in one place; Twilio adds its own small fee per message on top of Meta's.
Direct with WhatsApp (Meta)
- If you don't have one, create a Meta Business account at business.facebook.com.
- Go to developers.facebook.com → Create app, choose the Business type, link your business account, then add the WhatsApp product.
- In WhatsApp → API Setup, add and verify the phone number you'll send from. It can't be a number that's already registered on the ordinary WhatsApp or WhatsApp Business app unless you remove it from there first. Add a payment method in WhatsApp Manager when prompted.
- In WhatsApp Manager → Message templates, create the template (or both, if you want alerts and customer reminders) using the wording above: category Utility, a name in lower case with underscores (e.g.
appointment_reminderorbooking_alert), language English (UK). Wait for it to show as Active. - Create a permanent access token: Business Settings → Users → System users → add an Admin system user, assign it your app and your WhatsApp account, then Generate new token with the
whatsapp_business_messagingandwhatsapp_business_managementpermissions. (The token shown on API Setup expires after 24 hours, so don't use that one.) - In TrimBooking, choose Direct with WhatsApp and paste the Phone number ID (from API Setup — a long ID, not the phone number itself), the access token, the template name and its language code (
en_GBfor English UK). For alerts, add the number they should go to. Click Connect — we check the details with Meta straight away. - Customer reminders only — STOP replies: paste your app's App secret (App settings → Basic) too. After connecting, the card shows a Callback URL and Verify token; in your Meta app go to WhatsApp → Configuration → Webhook, enter both, and subscribe to the
messagesfield. From then on a customer replying STOP is opted out, and START opts them back in. - Send a test. If Meta hasn't approved the template yet, the test will tell you.
Through Twilio
- In your Twilio console, start Twilio's WhatsApp Senders flow to register a WhatsApp-enabled sender. This includes verifying your business with Meta.
- Once your sender is approved, create the template in Twilio Console → Messaging → Content Template Builder using the wording above, category Utility, and submit it for WhatsApp approval.
- Once approved, choose Through Twilio on the card and paste your Account SID, Auth Token, WhatsApp sender number and the template's Content SID (starts
HX...). For alerts, add the number they should go to. - Send a test. STOP replies to customer reminders are handled automatically through Twilio.
Using a different provider
TrimBooking's messaging is built around Telegram, Twilio and WhatsApp because they're the simplest for most businesses to self-serve. If you already use a different SMS, WhatsApp or other messaging provider — for sending, receiving, or both — get in touch via About & support and we can look at integrating it.
14. Using TrimBooking like an app on your phone
TrimBooking is deliberately not an app you download from the App Store or Google Play. It runs in the web browser that's already on every phone, tablet and computer. With one quick shortcut on your home screen it looks and feels just like an app: your own icon, your shop's name underneath, and it opens full screen with no browser address bar.
Why there's no app-store app (and why that's better for you)
- Improvements reach you straight away. When we add a feature or fix something, you have it the next time you open TrimBooking. App-store apps must go through Apple and Google review for every change, which can take days, and then wait for each person to update.
- Your customers never have to install anything. They tap your link from Instagram, Facebook, Google, WhatsApp or a text and book in seconds. Asking people to download an app first loses bookings; most simply won't.
- Your changes are instant everywhere. New services, prices, opening hours, staff, holidays, branding and your logo show on your booking page the moment you save them. Nothing to publish, nothing to wait for.
- One version for every device. iPhone, Android, iPad, laptop or the PC on your front desk: the same features on all of them, on the same day, with the same login. Old phones work too, and it takes up almost no storage.
- Your own web address. yourshop.trimbooking.co.uk works everywhere a link does: your Google Business profile, Instagram bio, website, receipts and posters (as a QR code).
- It helps keep the price down. Apple and Google take a cut of subscriptions sold through their stores and charge to publish there. Not being in the stores keeps TrimBooking simple and keeps your monthly price where it is.
- Tailored as we grow. Because everything is in one place, we can add features shops ask for (like client import, service categories or WhatsApp) within days, not app-release cycles.
Two honest differences: TrimBooking needs an internet connection (like your card machine), and alerts come by email, text, Telegram or WhatsApp (see section 12) rather than app pop-up notifications. For most shops that's exactly how they already work.
The quick way: the Add to Home Screen button
Every page of your booking site, your Dashboard and the staff portal has a small 📲 Add to Home Screen button in the top right corner, just under the header. On Android phones (Chrome, Samsung Internet, Edge) and on computers using Chrome or Edge, tapping it brings up the phone's own install prompt, so it's one or two taps. iPhones and iPads don't let websites add themselves, so there the button shows the two or three steps for the browser you're using. The button disappears once you're using the home-screen version. The step-by-step instructions below do the same thing by hand.
What you get from a home-screen shortcut
- An icon with your shop's logo (or your initials in your brand colour if you haven't added a logo).
- Your shop's name under the icon.
- It opens full screen like an app, with no address bar. On Android the top bar takes your brand colour.
Save the right page, because the shortcut opens wherever you were when you saved it:
- Owners and admins: log in and save it from your Dashboard. The icon is called "Your shop Admin".
- Staff: log in and save it from the staff portal. The icon is called "Your shop Staff".
- Customers: save your booking page, so they can rebook with one tap. Feel free to share these instructions with them.
Android: Samsung Internet (the default browser on Samsung phones)
- Open the Samsung Internet app (blue and white icon).
- Go to the page you want to save (for example your Dashboard).
- Tap the menu icon (three lines ☰) at the bottom right.
- Tap Add page to.
- Choose Home screen.
- Rename the shortcut if you like, then tap Add (tap Add again if asked).
Android: Google Chrome
- Open the Google Chrome app.
- Go to the page you want to save.
- Tap the three dots menu (⋮) in the top right.
- Tap Add to Home screen. Depending on your Chrome version this may say Install app or Create shortcut. Either works; Install gives the full-screen app look.
- Rename it if you like, then tap Add or Install.
- If it lands in your app drawer instead of the home screen, long-press the new icon in the app list and choose Add to home.
iPhone and iPad: Safari
- Open the Safari app.
- Go to the page you want to save.
- Tap the Share icon (a square with an arrow pointing up) at the bottom of the screen, or at the top on iPad.
- Scroll down the list and tap Add to Home Screen. If you don't see it, tap Edit Actions at the bottom and add it.
- Check Open as Web App is switched on (newer iPhones show this switch), type a name if you want a different one, then tap Add in the top right.
iPhone and iPad: Google Chrome, Firefox or Microsoft Edge
Up-to-date versions of these browsers can add a shortcut straight to the home screen:
- Open the browser and go to the page you want to save.
- Tap the Share icon. In Chrome it's in the address bar at the top; in Firefox and Edge it's in the menu or address bar.
- Tap Add to Home Screen (scroll down if you don't see it).
- Rename it if you like, then tap Add.
If your browser doesn't offer Add to Home Screen, update it from the App Store, or use Safari as above (it gives the best full-screen result on iPhone). As a last resort, you can make a shortcut with Apple's Shortcuts app:
- Open the Shortcuts app (it comes with every iPhone).
- Tap + in the top right to create a new shortcut, then tap Add Action.
- Search for Open URLs and choose it.
- Tap the faint blue word URL and type your page's address in the form your browser needs:
- Google Chrome: replace
https://withgooglechromes://, e.g.googlechromes://yourshop.trimbooking.co.uk/dashboard - Firefox: put
firefox://open-url?url=in front of the full address, e.g.firefox://open-url?url=https://yourshop.trimbooking.co.uk/dashboard
- Google Chrome: replace
- Tap the Share icon (square with an up arrow) at the bottom, then Add to Home Screen.
- Choose a name, and tap the small icon next to it if you'd like to use a photo of your logo.
- Tap Add in the top right.
On a computer (Windows PC, Mac or laptop)
- Google Chrome or Microsoft Edge: open your Dashboard, then click the install icon at the right of the address bar, or open the ⋮ / … menu and choose Install (in Chrome it may be under Cast, save and share). TrimBooking then opens in its own window and can be pinned to your taskbar or Dock.
- Safari on a Mac (macOS Sonoma or later): open your Dashboard, then choose File → Add to Dock.
Moving, renaming or removing the icon
- Press and hold the icon to move it, put it in a folder, or remove it.
- To rename it, remove it and add it again with the new name.
- Removing the icon doesn't delete anything. Your account and bookings are untouched.
15. Frequently asked questions
Is there a TrimBooking app?
Not in the app stores, on purpose: TrimBooking works in any browser so updates reach you instantly and customers never need to download anything. Add it to your home screen and it looks and works like an app. See Using TrimBooking like an app on your phone.
Can I change my business's web address?
Get in touch with TrimBooking support — changing it affects any links you've already shared.
Can a customer book with any available staff member?
Yes — customers can choose a specific staff member, or leave it open for the next available person.
What happens if I delete a staff member?
Their profile is removed from your booking page and, if they had their own login, that login stops working. Past bookings remain in your records.
Do customers need to create an account?
No. Customers book with just their name and contact details, and manage their booking via the personal link in their confirmation email.
Why is my utilisation blank or the heatmap empty?
Utilisation needs your opening hours and each staff member's working hours to be set, so TrimBooking knows how much time was bookable. The busy and quiet view also needs a few weeks of bookings to show a pattern.
Should I mark a staff member employed or self-employed?
If they're on your payroll and the money they take is part of your business's revenue, mark them employed — you'll see their schedule and earnings from your dashboard and Insights, same as the rest of your business. If they rent their own chair and keep their own takings, leave them self-employed (the default) so their earnings stay private to their own portal and out of your Insights revenue.
Can my staff see each other's earnings?
No. Staff can see everyone's bookings (that's how they cover for each other), but never anyone else's earnings, commission or portal. See Who can see and do what.
Why don't I see Revenue for a staff member I can see the schedule for?
Revenue on Insights only ever includes bookings handled by staff marked employed. A self-employed team member's schedule is visible to you (so you know who's in and when), but their takings are their own business, not the shop's — mark them employed instead if that should change.
Is there a cost to try it?
Every business gets a free 30-day trial with no card required. About a week before your trial ends, you'll get your first invoice with a Stripe payment link so there's time to pay before anything changes. If your account isn't marked as paid by the end of your trial, your booking page is temporarily switched off until you get in touch (see About & support).
Does no-show protection cost anything to turn on?
No — it's included free with every plan. A fee is only ever charged when a customer genuinely doesn't show up, and only if you choose to charge it.
Does SMS or WhatsApp messaging cost anything?
The feature itself is free. SMS runs through your own Twilio account, and WhatsApp through either your own Twilio account or directly with Meta — whichever you use bills you directly for what you actually send. TrimBooking never marks that up or takes a cut.
What happens if a customer replies STOP?
They're opted out of that channel (SMS or WhatsApp) for that shop going forward, regardless of what they ticked when they booked. Replying START opts them back in.